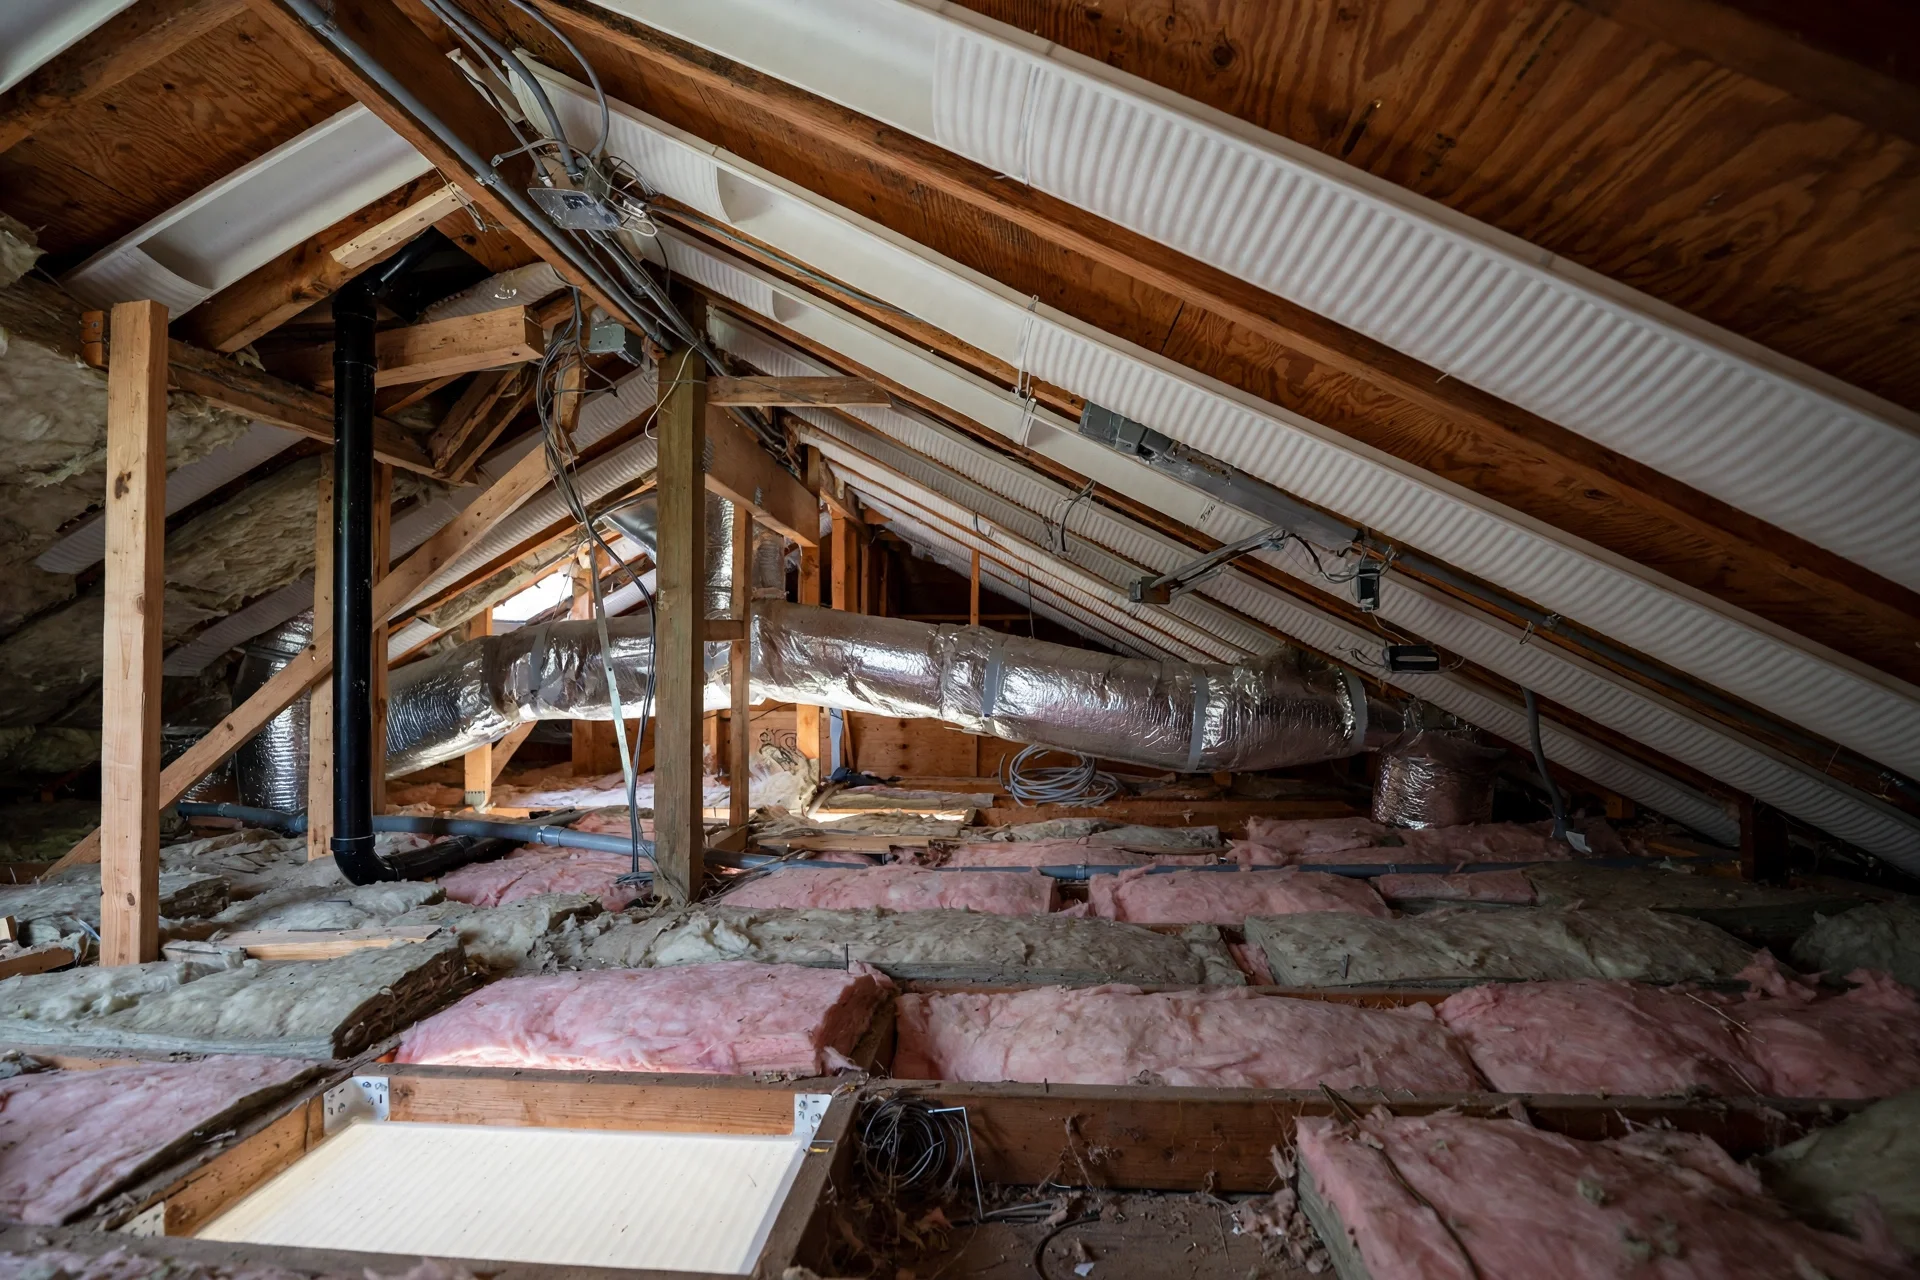
A roof with dormers, valleys, hips, and vaulted sections has more places for attic airflow to stall than a simple gable roof, and stalled air is how attics grow mould, ice dams, and prematurely aged shingles. Ventilation baffles are the fix: rigid channels fitted between the rafters that hold insulation back and keep a clear airway from the soffit vents up to the ridge. The short answer is that every rafter bay with a soffit vent needs a baffle, the airway must stay open past every duct, wire, and framing member in its path, and the intake and exhaust areas must stay balanced so air actually moves instead of just sitting in the attic.
This guide covers how to map the air path through a complicated attic, how to choose and fit baffles around the obstructions that real roofs contain, and how to check afterwards that air is genuinely flowing. The work is mostly done from inside the attic, and it pairs with insulation rather than replacing it.
Why Attic Airflow Stalls in Roofs With Complex Geometry
Air enters an attic low at the soffits, travels up the underside of the roof deck, and leaves high at the ridge or a gable vent. That path is simple on a plain gable roof, but every dormer, valley, skylight, and intersecting hip breaks it into separate pockets. Each pocket needs its own intake and its own route to an exhaust, and where the framing changes direction, the air often finds a dead end instead.
Insulation makes the problem worse when it is installed without baffles. Blown-in or batt insulation creeps toward the eaves, buries the soffit vents, and chokes off the intake completely. The attic then runs hot in summer and damp in winter, because the heat and moisture rising from the living space have nowhere to go. The first sign is often condensation on the underside of the roof deck or frost on the nails in cold weather, and both mean the ventilation path has failed somewhere.
How Ventilation Baffles Keep the Intake Path Open Around Obstructions
A baffle, also called a rafter vent, insulation baffle, or vent chute, is a rigid or semi-rigid channel stapled between two rafters at the eave. It holds insulation back from the soffit vent and keeps a continuous gap between the insulation and the roof sheathing, usually at least one inch, as required by the International Residential Code for vent and insulation clearance. Without that gap, the intake air has no route into the attic at all.
- Polystyrene baffles are light, cheap, and easy to cut, and they suit most standard rafter spacings.
- Cardboard baffles cost less and work in dry attics, but they soften if they get wet repeatedly.
- Clear plastic baffles let you see the vent opening behind them, which helps when checking the airway later.
- Foam-board baffles can be cut to fit odd angles and are useful around hips, valleys, and skylight framing.
- Site-built baffles from thin plywood or rigid foam board fill the gaps where no stock size fits.
The key detail is continuity. A baffle in every other bay leaves half the soffit vents blocked, and a baffle that stops short of the vent opening leaves a gap where insulation can spill through. Fit a baffle in every rafter bay that has a soffit vent, run it from the vent up past the top plate, and butt the sections together so the airway has no breaks.
Mapping the Air Path From Soffit to Ridge in a Complex Attic
Before buying baffles, draw the attic as a set of separate air spaces rather than one big room. Each dormer creates its own small attic, each valley separates two roof planes, and a vaulted ceiling removes the attic entirely in that section. Mark every soffit vent, every ridge vent or gable vent, and every obstruction between them, including ducts, plumbing vents, wiring runs, and cross-bracing.
Then trace the path air must take through each space. If a section has intake but no exhaust, or exhaust but no intake, it will not ventilate no matter how many baffles you install. Small sealed pockets sometimes need their own solution, such as a dedicated vent tile or a short duct to a nearby vented space, and it is better to find these pockets on paper than to discover them after the insulation is in.
Choosing Baffle Materials for Tight Rafters and Odd Angles
Standard baffles assume regular rafter spacing, usually sixteen or twenty-four inches on centre, and a straight run from eave to ridge. Complex roofs rarely oblige. Where rafters narrow around a dormer cheek or a valley jack rafter, cut the baffle to fit rather than forcing it, and seal the edges with foam so air cannot slip around the sides. Where the roof pitch changes, such as at a gambrel break or a mansard transition, use a flexible or site-built baffle that follows the angle instead of bridging across it.
| Baffle Material | Best For | Watch Out For |
|---|---|---|
| Polystyrene | Standard rafter bays, quick installs | Brittle in very cold attics, can crack |
| Cardboard | Budget jobs in dry attics | Softens and sags if it gets wet |
| Clear plastic | Checking vent openings after fitting | Costs more, can be hard to staple |
| Rigid foam board | Odd angles, hips, and valleys | Needs careful cutting and sealing |
| Plywood, site-built | Large or irregular bays | Heavier, takes longer to fit |
Material choice matters less than coverage. A cheap cardboard baffle that is fitted properly and sealed at the edges will outperform an expensive plastic one left with gaps at the sides. Buy a few extra of whatever you choose, because complex roofs always have a bay that needs a trimmed or doubled baffle, and a mid-job trip to the supplier is the slowest part of the work.
Installing Baffles Around Ducts, Wiring, and Framing Obstructions
Real attics are full of things that cross the air path. A duct running along the eave, a bundle of cables stapled to the rafters, a plumbing vent stack, or a diagonal brace can each block a baffle channel if you let them. The fix is to route the baffle around the obstruction rather than through it: cut the baffle to fit on either side, bridge the gap with a short section of rigid board, and seal the joints so the airway stays continuous.
- Ducts: shift the baffle to the next clear bay where possible, or build a boxed channel over the duct.
- Wiring: never trap cables inside a baffle channel; reroute them below the baffle or through a notched edge.
- Plumbing vents: cut the baffle around the pipe and seal the gap with foam so air cannot leak into the insulation.
- Cross-bracing: notch the baffle to pass the brace, then seal the notch so insulation cannot enter the airway.
- Skylight framing: extend baffles past the skylight’s side framing so air reaches the ridge above it.
Staple baffles to the sides of the rafters, not to the roof deck, and keep the staples clear of the vent opening itself. The baffle must cover the intake opening fully while leaving it open to air, which sounds contradictory but is exactly the point: the channel guides air in while holding insulation out. Check each bay from outside afterwards by looking through the soffit vent to confirm daylight and an open path.
Keeping Insulation Out of the Air Channel Without Losing R-Value
The tension in every attic is that insulation wants to be everywhere and ventilation wants a clear path through it. Baffles resolve this by defining the boundary: insulation runs right up to the baffle and stops, and the airway runs above it. Where blown-in insulation is used, add a blocking piece at the top of the baffle, sometimes called a wind dam, so loose fill cannot spill over the top of the baffle and into the soffit.
Do not solve the problem by skimping on insulation near the eaves. The edge of the attic is already the coldest part of the roof, and thin insulation there creates a cold stripe where condensation starts. Instead, keep the full insulation depth right up to the baffle, and let the baffle protect the airway. The one-inch minimum clearance is a floor, not a target: where the rafters are deep enough, a wider channel moves more air and tolerates a little insulation drift without blocking.
Balancing Intake and Exhaust So the Stack Effect Works for You
Ventilation runs on the stack effect: warm air rises and leaves through high vents, pulling fresh air in at the soffits. That only works when intake and exhaust are balanced. The code minimum is one square foot of net free ventilation area for every 150 square feet of attic floor, with the intake and exhaust roughly equal, and a ridge vent without open soffit vents does nothing at all. Count the net free area of the vents you actually have, not the size of the holes, because grilles and mesh reduce the free area considerably.
In a complex roof, balance the vents per section rather than for the whole attic. A dormer with its own ridge vent but no soffit intake will pull air from the main attic instead of from outside, and a large hip section with plenty of soffit vents but no exhaust will push air back out the way it came in. Walk the roof plan section by section and give each pocket matched intake and exhaust before moving on.
Checking Baffle Performance With Smoke, Temperature, and Moisture Clues
Once the baffles are in and the insulation is back, check that air is actually moving. On a cool day, hold a smoke pencil or a thin strip of tissue near a soffit vent inside the attic and watch whether it is drawn upward along the baffle channel. In summer, an infrared thermometer can show whether the roof deck temperature is reasonably even across the attic; hot patches often mark dead air spaces where the baffle path is blocked.
- Smoke test: a steady upward drift at the baffle confirms the intake path is open.
- Frost check: frost on nails or sheathing in winter points to trapped moisture and poor airflow.
- Temperature scan: large differences between bays suggest some channels are blocked and others are carrying all the air.
- Mould or staining: dark marks on the sheathing near the eaves usually mean damp air has been sitting there.
- Insulation drift: loose fill piled against a baffle means the wind dam is missing or has failed.
Re-check after the first winter and the first summer, because baffles can shift as the roof moves and insulation settles. A five-minute check each season catches a blocked bay before it becomes a mould problem, and it is far cheaper than opening up a finished attic to find out why the roof is sweating.
Baffle Retrofit Pitfalls in Finished Attics and Vaulted Ceilings
Retrofitting baffles into a finished attic is harder than fitting them during construction, because the ceiling below is already in place and the working space is tight. Where the attic is accessible, baffles can usually be slid in from the eave after pulling back the insulation, but where the ceiling is vaulted and there is no attic at all, the ventilation path may need to be created from outside during a re-roof, using a vented nail-base or a counter-batten system above the deck.
Do not cut corners by ventilating only the easy bays and leaving the awkward ones sealed. A half-ventilated complex roof often performs worse than an unventilated one, because the vented sections pull moist air through the unvented pockets on its way out. If a section truly cannot be vented, the honest answer is to insulate it as an unvented assembly with the right air and vapour control layers, and to get that design checked by a professional rather than improvising it.
Roof Ventilation Baffle FAQs: Clearance, Materials, and Airflow
How much clearance must a baffle maintain above the insulation?
The International Residential Code requires at least one inch of clearance between insulation and the roof sheathing at the vent location. In practice, a wider channel is better where rafters allow it, because it moves more air and tolerates a little insulation drift without blocking.
Does every rafter bay need a baffle?
Every bay with a soffit vent needs one. Bays without vents do not need baffles, but skipping bays that do have vents leaves half the intake blocked and defeats the purpose of the ventilation system.
Can baffles be installed in an existing attic with insulation already in place?
Yes, in most cases. Pull the insulation back from the eaves, fit the baffle between the rafters, add a wind dam at the top, and push the insulation back up to the baffle. Wear a respirator and gloves, because old insulation is dusty and irritating.
What happens if soffit vents are blocked but the ridge vent is open?
Almost nothing. A ridge vent only exhausts air that enters somewhere, and without open soffit intake the attic cannot draw fresh air in. The ridge vent becomes decorative, and the attic stays hot and damp.
Are baffles needed with spray foam insulation?
It depends on the assembly. With open-cell spray foam in a vented attic, baffles still protect the intake path. With closed-cell foam in an unvented assembly, baffles are usually unnecessary because there is no ventilation path to protect, but that design must be done deliberately and checked against local code.
Final Thoughts: A Roof That Breathes Around Every Obstruction
A complex roof does not need a complicated ventilation system; it needs a complete one. Every intake needs a baffle, every baffle needs a clear path past the ducts and framing in its way, and every section of the roof needs matched intake and exhaust. Do the mapping first, fit the baffles carefully, and check the airflow with smoke and temperature after the insulation goes back. The reward is an attic that stays dry in winter and cool in summer, and a roof that lasts as long as the shingles on it were meant to.