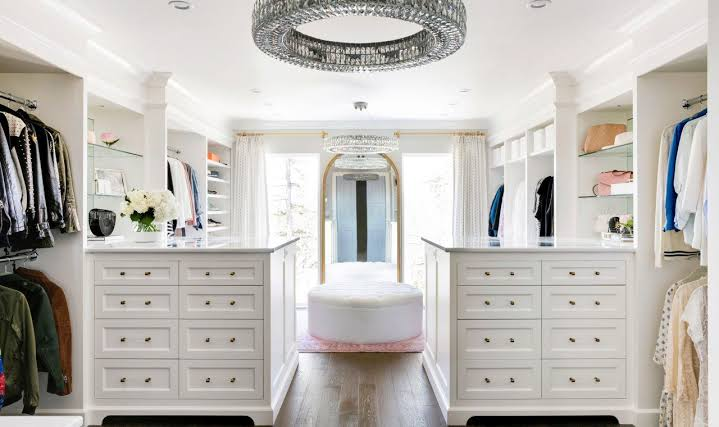
A walk-in closet can hold hundreds of dollars of clothing and still feel frustrating every morning if you cannot see any of it properly. One dim bulb in the middle of the ceiling is the usual culprit. It lights the front row of shirts, while shoes, folded sweaters, and the back of each rail sit in shadow. You end up mixing navy with black and overlooking items you forgot you owned.
Good closet lighting is not about buying the brightest fixture you can find. It is about placement. When light comes from the right height and angle for each zone — rails, shelves, and shoe racks — everything becomes easier to find and put back. This guide covers where to put each type of light and what it costs.
Closet Lighting Basics: Think in Layers, Not One Fixture
Designers plan closet lighting in three layers. Ambient light fills the whole room. Task light targets a specific job, such as reading labels on boxes. Accent light highlights a display shelf or mirror. A closet with only one layer almost always has dark corners.
Before you buy anything, stand in the closet when you normally dress and note where shadows fall. Aim for 20 to 30 lumens per square foot overall, with task zones of 50 lumens or more above shelves and mirrors. A 6 by 8 foot closet needs roughly 1,000 to 1,500 lumens, which several small fixtures deliver better than one large one.
- Map your zones first: hanging, folded storage, shoes, and accessories.
- Keep switches where you reach them naturally as you enter, not behind the door swing.
- Choose fixtures rated for closet use and keep bulbs at least 12 inches from stored clothing.
- Plan power early — hardwired, plug-in, and battery options suit different budgets.
Ceiling and Recessed Lighting for Even Overall Coverage
Ceiling light is your ambient base, and placement matters more than wattage. A single flush-mount fixture in the center works for a small, square closet, but in a rectangular or L-shaped closet it leaves the ends dim. Two smaller fixtures spaced evenly, or a short track with three adjustable heads, gives far more even coverage — angle one head toward the shoe wall and another toward long dresses.
Recessed downlights, or can lights, give a clean look and keep the ceiling clear. Space 4-inch LED recessed lights about 3 to 4 feet apart, and position the row 20 to 24 inches out from the face of your shelving rather than directly above it. That offset washes light down the front of your clothes instead of creating a bright stripe on the top shelf and darkness below. Avoid a recessed light directly over where you stand to dress, because it casts your own shadow over everything in front of you.
A quality LED flush mount runs $40 to $120, recessed retrofit kits cost $15 to $35 each, and an electrician typically charges $150 to $300 per new hardwired point. If your closet has no ceiling light at all, a battery ceiling light for $25 to $60 is a reasonable interim step.
LED Strip and Puck Lights for Shelves and Cabinets
LED strips and puck lights do the detailed work ceiling fixtures cannot. A strip hidden under the front edge of each shelf lights the shelf below it, so folded jeans and bins are visible without moving anything. Puck lights, small round discs about 2 to 3 inches wide, suit individual cubbies or a single display shelf where a full strip would be wasted.
- Mount strips facing downward or at 45 degrees, set back 1 inch from the shelf edge, so you see lit clothes, not bare diodes.
- Use aluminum channel with a frosted cover ($10 to $18 for 6 feet) to diffuse light and give a built-in finish.
- Pick plug-in strips for a quick retrofit ($15 to $30 per 6 feet), or hardwired strips for a remodel.
- Battery pucks ($12 to $20 for six) suit renters, but choose rechargeable USB models to avoid replacing batteries.
Connect strips in a continuous run where you can. Most 24-volt systems run 16 to 20 feet from one driver, covering one wall of shelving. Keep the driver accessible, such as on the top shelf.
Lighting for Hanging Sections So Clothes Show Their True Color
Hanging clothes are the hardest to light well because they face outward in a dense row. Light from behind the rail is useless — it silhouettes the hangers and leaves fronts in shade. Light must fall on the front face of the garments, so the source should sit in front of the rail, angled slightly back toward it.
The most effective option is a vertical LED strip or slim bar mounted just in front of each hanging section, roughly 12 to 18 inches in front of the rail. For double-hang sections, add light at two heights: a strip under the shelf above the top rail, and another under the mid-shelf. Without that second source, the lower rail sits in the shadow of the clothes above it.
Long-hang areas for dresses and coats need a taller wash of light. A vertical strip running most of the section height works better than a short puck at the top. If hanging runs on both sides of a center island, light each side on a separate switch, so you are not flooding the whole closet to find one shirt at 6 a.m.
Shoe and Shelf Illumination at Floor and Eye Level
Shoes live in the darkest part of most closets: the floor. By the time ceiling light travels past every rail and shelf, you cannot tell brown from burgundy. A low LED strip along the base of the shoe shelving, or under the lowest shelf about 6 to 8 inches above the shoes, changes that. Angled slightly downward, it picks out toe caps and doubles as a gentle guide light at night.
Eye-level shelves need less help than top and bottom ones. The top shelf benefits from a puck or short strip so you can read labels without a phone flashlight. Display shelves for bags look best with a strip at the back. Keep everyday shelves practical: front-mounted strips and no exposed glare.
- Angle shoe lighting down at stored pairs so leather colors read accurately.
- Top shelves need direct light, not spill from the ceiling.
- Add a small light in deep corners — these are where lost items accumulate.
Motion Sensors and Smart Controls That Switch on for You
You enter a closet with your hands full, so hands-free controls earn their keep. A motion sensor that turns lights on as you step in and off two to five minutes after you leave saves energy and solves the forgotten-light problem. Expect to pay $20 to $45 for a sensor wall switch, or $15 to $25 for a plug-in sensor for strip lights.
Mount the sensor where it sees the doorway and main standing area, not behind hanging clothes. In larger closets, two sensors prevent lights cutting out while you stand still trying on shoes. Set the timeout to at least three minutes.
Smart bulbs and app-controlled strips ($12 to $25 per bulb) let you set a bright morning scene and a softer evening scene, and voice control helps when you are carrying laundry. Do not overcomplicate a small closet, though. A reliable sensor and a dimmer deliver most of the benefit for a fraction of the cost, and they still work when the Wi-Fi does not.
Color Temperature and CRI: Getting Clothing Colors Right
Two numbers decide whether clothes look right. Color temperature, in kelvins, describes whether light looks warm or cool. CRI, the Color Rendering Index, describes how accurately colors appear under it. The sweet spot is 3000K to 4000K — warm enough to feel comfortable, neutral enough that whites do not look yellow. Below 2700K, navy and black become almost impossible to separate. Above 5000K, light feels clinical and washes out skin tones at the mirror.
Budget LEDs often rate CRI 80, which flattens reds and deep greens in clothing. CRI 90 or higher fixtures, usually a $3 to $8 premium per bulb or strip, give a truer read on patterns and whether a top matches a skirt. Test before you commit: buy one bulb, hold something navy, something black, and something patterned under it, and only then order for the whole closet.
- Use one color temperature throughout — mixing 2700K and 4000K makes matching harder.
- Choose CRI 90+ for dressing and hanging zones, even if utility shelves use standard bulbs.
- Add front-facing light at the mirror, at face height on both sides, to avoid shadows.
Final Thoughts
Improving a walk-in closet rarely requires a full renovation. Start with the darkest zone you use daily — usually the lower rail or the shoe floor — add strip or puck light there, and live with it for a week. Then build your layers: even ceiling coverage, front light for hanging clothes, shelf light where folded items hide, and a sensor so it all works without thinking. Keep the color temperature consistent and the CRI high, and the closet will help you dress instead of slowing you down. It saves minutes each morning and protects overlooked clothes.
Frequently Asked Questions
How bright should walk-in closet lighting be?
Aim for 20 to 30 lumens per square foot overall, with about 50 per square foot at shelves and mirrors. A typical 6 by 8 foot closet needs roughly 1,000 to 1,500 total lumens, spread across a ceiling fixture plus strips.
Can I install closet lighting without an electrician?
Yes, for plug-in and battery options. Plug-in strips, rechargeable pucks, and battery ceiling lights need no wiring and suit renters well. Hardwired recessed lights and new switches should be installed by a licensed electrician to meet local codes.
Are battery or rechargeable puck lights worth it?
They are worth it for one or two problem spots, such as a dark cubby or the top shelf, at $12 to $20 for a multipack. For a whole wall of shelving, plug-in strips are cheaper and more reliable than charging many small batteries.
What is the best bulb color for choosing outfits?
Choose 3000K to 4000K with a CRI of 90 or higher. That range separates navy from black and judges patterns accurately, without the harsh feel of bulbs above 5000K. Keep the same temperature on every fixture.
How much does it cost to upgrade closet lighting?
A basic upgrade with plug-in strips and pucks costs $50 to $150. A mid-range project with a new ceiling fixture, hardwired strips, and a sensor runs $300 to $700 including an electrician. A custom remodel with recessed lights and smart controls can reach $1,000 to $2,000.