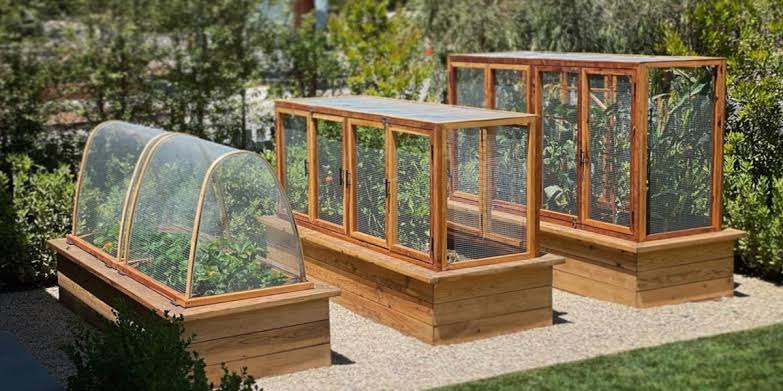
A raised bed can be built in an afternoon, but moving it once filled with soil is a miserable job, so placement is the most important decision you will make. The right spot gets the light vegetables need, drains after rain, and sits where you will actually water, weed, and harvest it. The wrong spot becomes a shaded, soggy chore you ignore by midsummer.
You do not need a perfect yard. Watch it honestly for a few days, understand the trade-offs below on sunlight, drainage, orientation, water, wind, and materials, and then build once.
Mapping Sunlight in Your Backyard
Most fruiting vegetables, including tomatoes, peppers, cucumbers, and squash, need six to eight hours of direct sun a day. Leafy greens, herbs, and root crops manage with four to six hours. Anything under four hours is best left for shade planting, seating, or storage, not food beds.
Do not guess from memory. On a clear day, check the likely bed site at 9 a.m., noon, and 3 p.m., and note where shadows from fences, trees, and the house actually fall. A free phone sun-tracking app can show the sun path for June and December, which is useful because a spot that is sunny in April may be shaded by a leafed-out maple in July.
A Simple Weekend Sun Map
- Sketch the yard on paper and mark north, fences, trees, and buildings.
- Photograph the site every two hours on a sunny weekend day.
- Mark each area as full sun, part shade, or full shade on your sketch.
- Place thirsty, sun-loving crops only in the full-sun zones you confirmed.
Watch deciduous trees carefully. Their canopy can cut a bed from eight hours of sun to three. A bed on the southern side of a tree usually fares far better than one tucked beneath it.
Drainage and Ground Conditions
Raised beds drain better than in-ground rows, but they cannot fix a swamp. If water stands in a low corner for a day after rain, it will also sit under your bed, rotting timber, cooling the soil, and inviting mosquitoes. Choose ground that is level or gently high, and avoid the natural dip where roof runoff and patio water collect.
Test before you build. Dig a hole about 12 inches deep, fill it with water, and let it drain. If the second filling empties within a few hours, drainage is fine. If it is still full the next morning, pick another spot or plan to raise the bed higher and add a gravel layer underneath.
- Call your local utility marking service before digging or driving stakes.
- Avoid soil near old painted structures or driveways where contamination is possible; test it or line the bed if in doubt.
- Keep beds clear of septic fields, buried lines, and tree roots that will heave the frame.
- Level the site with a spade and board rather than building a tilted bed that sheds water to one end.
On a gentle slope, terrace two shorter beds instead of building one long bed on a bank where you must weed standing downhill.
Orientation and Spacing for Light and Reach
In the Northern Hemisphere, long beds that run roughly north to south share sunlight most evenly, with the morning sun on one side and afternoon sun on the other. East-to-west beds can work, but tall crops on the southern edge will shade shorter plants behind them, so plant tall crops at the northern end instead.
Size the bed around your reach, not your ambition. A bed 4 feet wide lets most adults reach the center from either side without stepping in and compacting the soil. If a bed must sit against a fence, keep it to 2 or 3 feet wide so you can reach across it from one side. Lengths of 8 to 10 feet are practical; longer beds make you walk around them constantly.
Spacing That Makes Maintenance Easier
- Leave 24 to 36 inches between beds for a wheelbarrow, kneeler, and hose.
- Keep main paths at 36 to 48 inches if you use a mower or cart there.
- Group beds together rather than scattering single beds around the yard.
- Leave room at the ends to turn, dump compost, and set down a harvest basket.
Tight spacing feels cramped by June, when plants spill over and weeding starts with moving tools out of your own way.
Proximity to Water and the Kitchen
The best bed is the one you visit daily, and distance decides that. Beds near the kitchen or back door get picked at the right moment, watered before they wilt, and checked for pests while problems are still small. Beds at the far end of the yard get forgotten during busy weeks, which is exactly when heat makes watering matter most.
Water access matters too. Dragging a 50-foot hose around corners gets old fast, so place beds within easy hose reach of a tap, or budget for drip irrigation. A basic drip kit for two beds costs $40 to $90 and, on a $15 to $25 timer, waters at dawn while you sleep.
Herbs and salad greens deserve the closest bed. You cut them in small amounts while cooking, and a ten-step trip in the rain is realistic; a walk to the fence line is not.
Wind and Microclimate
Every yard has warm corners and cold pockets. A south-facing wall absorbs heat by day and releases it at night, giving peppers and basil a head start in spring. The same corner can scorch plants in a hot climate, so match the microclimate to the crop.
Steady wind dries soil, snaps tall stems, and stresses transplants. A fence or hedge can break it without blocking light. Avoid enclosed low corners, though, where cold air settles on clear nights and creates frost pockets that damage tender plants first.
- Stake tall crops on the sheltered side of a bed in exposed yards.
- Use a wall-warmed spot for early spring and late fall plantings.
- Keep a thermometer in the bed area for a week if you suspect a cold pocket.
- Mulch exposed beds with 2 to 3 inches of straw or shredded leaves to slow drying.
Bed Height and Material Choices
Standard beds are 10 to 12 inches high, which suits most vegetables and keeps soil costs sane. A 4-by-8-foot bed at that depth needs roughly 24 to 27 cubic feet of soil mix, often $100 to $180 bagged or far less bought in bulk. Beds 18 to 24 inches high are kinder to bad backs and knees and warm up faster in spring, but they need more soil, dry out faster, and cost noticeably more to fill.
Comparing Common Materials
- Untreated pine or fir: cheapest at roughly $30 to $60 per bed, but expect five to seven years before boards soften.
- Cedar or larch: naturally rot resistant for ten years or more, typically $80 to $150 per bed in lumber.
- Galvanized steel kits: often $70 to $160, quick to assemble, durable, but they heat up at the edges in very hot sun.
- Concrete blocks or stone: sturdy and permanent, good on slopes, but hard to move and slower to build.
Avoid placing a tall bed where it will shadow a shorter one, and sketch heights as well as footprints. If burrowing pests are a problem, line the bottom with hardware cloth, not solid plastic, so drainage still works.
Seasonal Planning and Crop Rotation
Sunlight in your yard is not fixed. The sun rides higher in June and lower in October, so a fence that shades nothing in summer may shade a bed for most of the day in fall. If you want fall greens and spring peas, check the low-sun months before fixing beds permanently, and keep one flexible bed or large containers for seasonal experiments.
Rotation protects the soil you paid for. Avoid planting the same crop family in the same bed year after year, because tomatoes, peppers, and potatoes share diseases that build up in soil, and heavy feeders deplete the same nutrients. A simple three- or four-bed rotation works well: fruiting crops one year, leafy greens and roots the next, then beans and peas, which add nitrogen, before the cycle repeats.
- Label each bed and keep a one-page note of what grew where each year.
- Top up beds each spring with 1 to 2 inches of compost as soil settles.
- Sow a fall cover crop such as clover or winter rye in empty beds.
- Move shade cloth, trellises, and cold frames between beds as seasons change.
Succession planting, small sowings of lettuce or radishes every two weeks, gives steady harvests instead of one glut.
Final Thoughts
Good placement is mostly observation. Map the sun before you buy lumber, test drainage before you order soil, and keep beds close to water and the kitchen, with room to work around them. Start with two or three beds in your best spot rather than six spread across the yard. After one season you will know your light and habits far better, and expanding a bed that works beats fixing one that never did.
Frequently Asked Questions
How many hours of sun do raised beds really need?
Aim for six to eight hours for tomatoes, peppers, and most fruiting crops. Leafy greens, herbs, carrots, and beets do well with four to six hours. With only five hours, grow greens there and put fruiting crops in containers in the sunniest patch.
What is the best size for a first raised bed?
A 4-by-8-foot bed about 11 inches high is the classic starter size. You can reach the center from both sides, standard lumber cuts cleanly to fit, and it holds enough soil for a useful mix of crops without making the first soil bill painful.
Can I put a raised bed on a slope or on concrete?
Yes, with preparation. On a slope, level a terrace for each bed or step shorter beds down the hill. On concrete or a patio, use a bed at least 12 to 18 inches deep, ensure water can drain out the bottom, and expect to water more often in hot weather.
How far should beds be from trees and fences?
Keep beds a few feet from fences so air circulates. Near trees, shade and roots matter most: with six hours of sun and no heaving roots, it can work, though extra water may be needed.
Can I move a raised bed if I choose the wrong spot?
You can, but an 8-foot bed holds over a thousand pounds of damp soil, so moving means emptying it first. Observing sun and drainage for a week before filling it is time well spent.