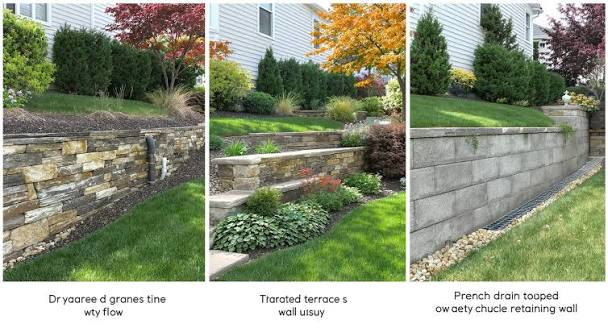
A retaining wall rarely fails because the blocks, stone, or concrete were too weak. It fails because water got trapped behind it. Saturated soil weighs far more than dry soil and pushes with surprising force, bowing a wall outward, opening its joints, and eventually tipping whole sections forward. The good news is that almost all of this damage is preventable. A wall with a free-draining gravel zone, a pipe at its base, clear outlets, and ground that sheds surface water can stand straight for decades. This guide covers each part of that system, with the spacing, sizes, and costs that matter when planning a new wall or saving an existing one.
Why Retaining Walls Fail
Understanding the forces involved explains why drainage is not an optional extra. Four problems account for the great majority of leaning, bulging, and collapsed walls in residential gardens.
Hydrostatic Pressure Builds Behind the Wall
When rain and groundwater have nowhere to go, they collect in the soil behind the wall. That trapped water creates hydrostatic pressure, pushing horizontally against the structure with every inch of depth. A wall designed only to hold back soil is suddenly holding back soil plus water. Pressure is worst after prolonged rain, during spring thaw, and in clay soils that release water very slowly.
Saturated Soil, Frost, and Poor Compaction
Wet soil is heavier and weaker than dry soil, so it slumps and presses harder. In cold climates, trapped water freezes and expands, jacking blocks apart a little each winter. Loosely dumped backfill also settles unevenly, leaving low spots that collect even more water. Watch for these early warning signs:
- A forward lean or bulge, especially in the lower third of the wall
- White mineral staining, damp patches, or muddy seepage through the joints
- Soil washing out at the base, sinkholes, or a gap opening behind the top course
- Cracks in mortared or poured walls that widen after wet weather
Weep Holes and Drainage Outlets
Weep holes give water that reaches the face of the wall a direct escape route. They are standard on poured concrete and mortared masonry walls, and they work best as a backup to a full drainage system, not as a replacement for one.
For most residential walls, drill or form holes about 2 inches in diameter, spaced 4 to 6 feet apart, just above ground level on the exposed face. On taller walls, a second row partway up is sometimes added. Keep the area behind each hole packed with clean gravel, not soil, or it will clog within a season or two. A short length of PVC pipe set with a slight downward slope keeps the opening neat and deters insects.
Just as important is where the main drainage pipe daylights. Every system needs a clear outlet at the low end of the wall, discharging onto open ground, into a dry well, or into a storm drain where rules allow. An outlet buried under mulch or blocked by planting defeats the whole system, so mark its location and keep it visible.
Gravel Backfill and Drainage Pipe
This is the heart of good wall drainage, and the part most often skimped on because it is invisible once finished. Done properly, it costs a few hundred dollars more. Skipped, it can lead to a $3,000 to $8,000 rebuild.
Build a Gravel Drainage Zone, Not a Soil Plug
Excavate at least 12 inches behind the wall, and more for walls over 4 feet tall, then fill that zone with clean, angular drainage gravel, typically 3/4-inch washed crushed stone with no fine dust. Angular stone locks together and leaves open voids for water to fall through quickly. Rounded pea gravel rolls and shifts, and stone with dust packs almost as tightly as soil. Compact the soil backfill in lifts of about 6 inches, but do not crush the drainage gravel’s void space.
Lay the Perforated Pipe at the Footing
- Use 4-inch perforated PVC or corrugated drainage pipe along the base of the wall, behind the footing, with the perforations facing down so water can rise into the pipe.
- Give the pipe a gentle fall, roughly 1 inch for every 8 to 10 feet, toward the outlet so water flows out instead of sitting in the line.
- Bed the pipe in gravel and cover it with several inches of gravel before any soil goes in above it.
- For long walls over about 40 feet, plan an outlet at each end or a cleanout point so the line can be flushed if it ever silts up.
On a typical 20-foot wall, gravel and pipe together run roughly $250 to $600 in materials, a small share of the total project cost.
Drainage Fabric and Soil Separation
Gravel only keeps draining if soil stays out of it. Without separation, fine particles migrate into the stone with every rainfall, gradually turning a free-draining zone into a dense, muddy mass. This silting is slow and invisible, which is why many walls seem fine for five years and then start moving quickly.
The fix is a non-woven geotextile drainage fabric lining the gravel zone, separating it from the native soil on all sides, like a lining inside a pocket. Overlap seams by at least 12 inches and fold the top edge down before adding topsoil. Choose non-woven drainage fabric, not a woven weed membrane, which blocks water and traps moisture behind the wall. Good fabric costs only $0.15 to $0.40 per square foot, so there is no sensible reason to leave it out.
Grading and Surface Water Control
Even a perfect system behind the wall can be overwhelmed if surface water pours over the top. Managing water above the wall is often the cheapest improvement you can make.
- Grade the ground above the wall so it slopes gently away for at least the first few feet, rather than dipping toward the wall.
- Cap the gravel zone with a layer of compacted, low-permeability soil or clay near the surface, topped with topsoil, so rainfall sheds across the surface instead of soaking straight down into the drainage zone.
- Keep roof downspouts, sump pump discharges, and driveway runoff well away from the wall; extend downspout outlets at least 5 to 10 feet beyond it.
- Where a slope above the wall sheds a lot of water, add a shallow swale or an interceptor drain across the top to catch runoff and carry it around the ends of the wall.
- Never direct a sprinkler system at the back of a wall, and avoid planting thirsty beds that need constant watering directly behind it.
These steps matter most on sloping lots, where one storm can send hundreds of gallons toward a single stretch of wall.
Wall Materials and Drainage Compatibility
Different wall types drain differently, and the details need to match the material. Segmental concrete block walls are forgiving: their dry-stacked joints let some water escape through the face, and hollow cores can be filled with gravel. They still need the full gravel zone and footing pipe, because face joints alone cannot handle sustained groundwater.
Poured concrete and mortared stone or brick walls are essentially watertight, so they depend entirely on weep holes and the pipe behind them. Timber walls drain through gaps between boards at first, but drainage slows as soil presses tight against the wood, making the gravel zone especially important. Dry-stone walls drain freely through open joints and tolerate wet sites well, provided the backfill is stone rather than soil. Whichever material you choose, never let a builder backfill directly against the wall with the clay dug out of the hole. That single shortcut causes more failures than any other.
Inspecting and Maintaining Wall Drainage
A well-built system needs little attention, but a short inspection twice a year, in spring and after heavy autumn rains, catches problems while they are cheap to fix:
- Outlets and weep holes are clear; poke out debris and trim back plants or mulch covering them.
- Water actually flows from the outlet during or just after rain; a permanently dry outlet on a wet site can mean a blocked pipe.
- No new lean, bulge, or opened joints have appeared; photograph suspect spots and compare them season to season.
- The ground above the wall still slopes away, with no settled dips ponding water against the top course.
- Downspouts and surface drains nearby still discharge well clear of the wall.
If an outlet stops flowing, try flushing it with a garden hose. Persistent damp patches or movement that grows between inspections are signs to call a contractor early. Regrading or clearing an outlet might cost $200 to $800, while rebuilding a failed section commonly runs several thousand dollars.
Final Thoughts
Retaining wall drainage is unglamorous, buried work, but it decides whether a wall lasts five years or fifty. Give water a gravel path down, a pipe to travel along, fabric to keep that path clean, and an outlet to leave by. If you are building new, insist on seeing those layers before they are buried. If an existing wall is leaning or weeping mud, fix the water first. In almost every case, the drainage is the wall.
Frequently Asked Questions
How much does proper retaining wall drainage add to the cost?
Gravel, pipe, and fabric usually add about $250 to $700 in materials plus a few hours of labour, a small fraction of the build cost and far less than a $3,000-plus rebuild.
Can drainage be added to an existing wall that has none?
Yes, though it means excavating behind the wall. Contractors dig to the footing, install gravel, fabric, and a pipe, then backfill correctly. Where digging is impossible, regrading, added weep holes, and a drain above the wall still reduce pressure significantly.
How far apart should weep holes be?
A common rule is one hole about 2 inches wide every 4 to 6 feet along the wall, placed just above ground level. Taller mortared or concrete walls may need a second row. Keep gravel behind each hole so it does not clog with soil.
Does the drainage pipe need an outlet, or can it end behind the wall?
It must have an outlet. A pipe with nowhere to discharge simply fills with water and stops draining. Run it to daylight at the low end of the wall, to a dry well, or to an approved storm drain, and keep that outlet clear and visible.
What is the first sign that wall drainage is failing?
Look for damp or white-stained patches, muddy water seeping from joints after rain, soil washing out at the base, or a slight forward lean. Any of these means water is building up behind the wall.