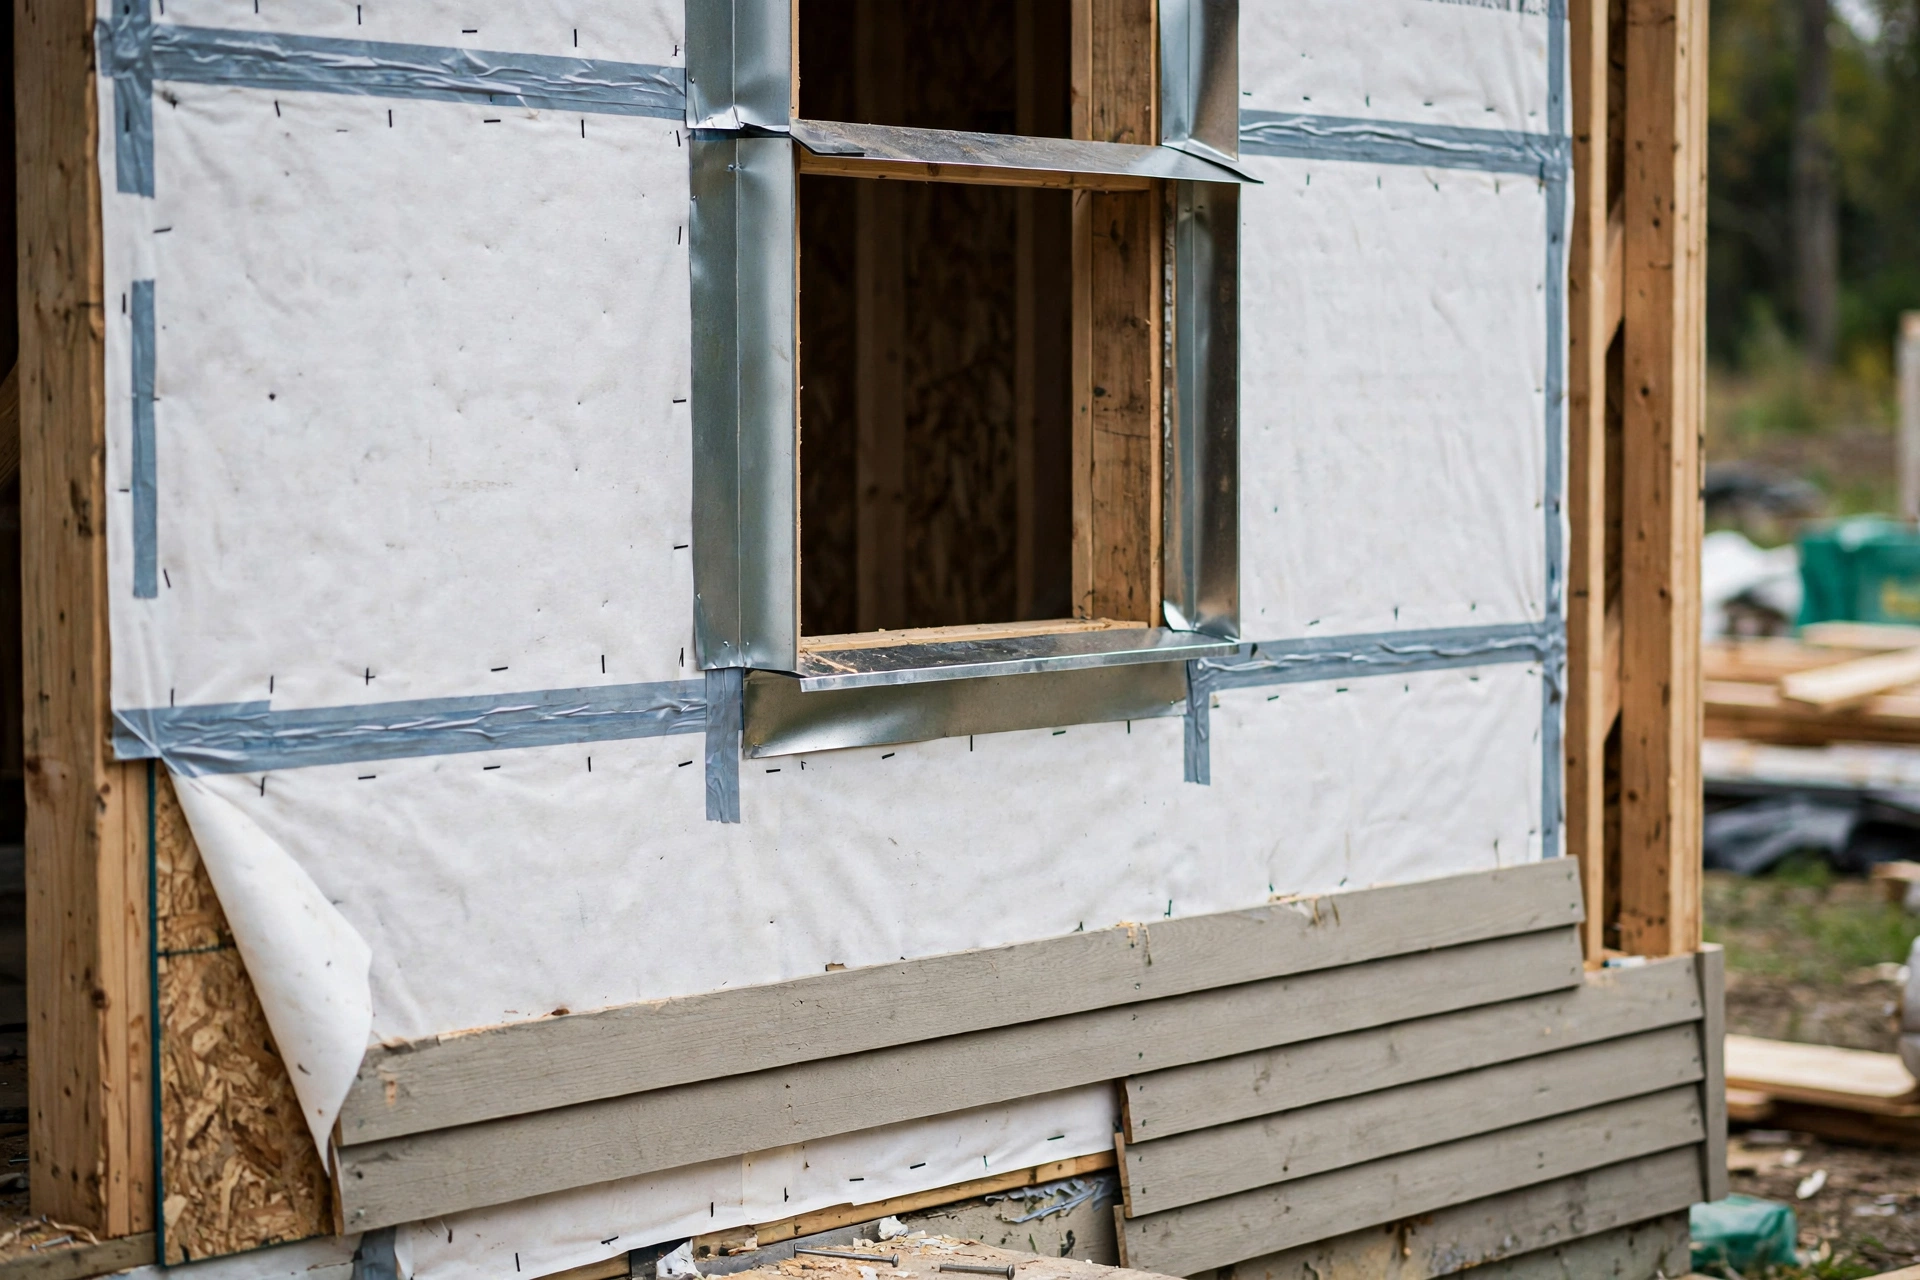
Exterior walls fail slowly and quietly. Rain finds a gap around a window, soaks into the sheathing, and the timber stays damp just long enough for rot to start. Freeze and thaw widen the damage, paint peels, and by the time the problem shows on the inside, the repair is already expensive. The durability of a wall has surprisingly little to do with how tough the siding looks, and almost everything to do with the hidden layers behind it: flashing that sheds water, a drainage plane that lets it out, and weatherproofing that keeps the structure dry.
The most effective way to improve exterior wall durability is to treat the wall as a water management system. Siding sheds most of the rain, a weather-resistant barrier and a drainage gap carry away whatever gets behind it, and flashing at every opening, joint, and transition directs water outward at each vulnerable point. When those three layers work together, the wall can stay dry for decades, even in a wet climate.
Why Siding Alone Cannot Keep an Exterior Wall Dry
It surprises many homeowners to learn that siding is not waterproof, and it is not meant to be. Vinyl, timber, fibre cement, and brick all shed most rain, but wind-driven rain, capillary action, and simple gravity push some water past every cladding. That is normal, and wall assemblies are designed with that fact in mind. The trouble starts only when the water that gets in has no way out.
A wall without a drainage plane traps water against the sheathing, where it soaks into wood panels, corrodes fasteners, and feeds mould. A wall with a proper drainage gap gives that water a path down and out, and gives the wall a chance to dry between storms. This is why two houses with the same siding can age very differently: the durable one is the one whose hidden layers were installed correctly, not the one with the more expensive cladding.
What Does the Weather-Resistant Barrier Behind the Cladding Actually Do?
The weather-resistant barrier, often called housewrap, is a breathable membrane fixed over the sheathing before the cladding goes on. Its job is twofold: block liquid water that gets behind the siding, and let water vapour from inside the house escape. That second job matters as much as the first, because moisture from cooking, showers, and breathing moves outward through the wall, and if it is trapped it condenses and rots the framing from the inside.
Housewrap must be installed with care to work. Seams should overlap like shingles, with upper layers over lower ones, and joints should be taped with the manufacturer’s approved tape. Tears and punctures should be patched, and the bottom edge should terminate where water can drain out, not into a sealed pocket. Alternatives such as liquid-applied membranes or taped foam sheathing can perform the same role, but whichever system is used, continuity is everything: a single unsealed gap can admit more water than a whole wall of correctly installed barrier.
Flashing Every Opening the Way Water Actually Travels
Flashing is thin metal or flexible membrane placed wherever water is likely to enter, and windows and doors are the most important of those places. A proper window installation starts with a sloped sill pan that catches any water that gets past the frame and drains it to the outside, then jamb flashing up the sides, then head flashing over the top, each layer overlapping the one below it so water always sheds outward.
Flashing Roof, Deck, and Chimney Intersections That Leak Most
The places where a wall meets something else are where most wall leaks begin. Where a roof meets a side wall, step flashing should run up the wall in overlapping pieces, each one shedding water onto the shingle below, with a kick-out flashing at the bottom that throws water into the gutter instead of letting it run down the wall. A missing kick-out is one of the most common and most damaging flashing defects in residential construction.
Drainage Gaps and Ventilated Cladding That Let Walls Dry
A drainage gap is a small air space between the weather-resistant barrier and the back of the cladding, and it transforms how a wall handles water. Rain that gets behind the siding runs down the gap and out at the bottom, and air moving through the gap dries the wall between storms. Even a gap of around 10 millimetres makes a measurable difference, and it is standard practice in wet climates for good reason.
Creating the gap is straightforward during a re-cladding project: vertical battens or a drained mat product hold the siding off the barrier. At the bottom of the wall, leave an open path for water to escape, with insect screening that does not block drainage, and keep the bottom of the cladding clear of soil and mulch so water and splash do not sit against it. Walls that cannot dry are walls that rot, and a drainage gap is the cheapest drying mechanism a wall can have.
Choosing Cladding That Suits the Climate, Not Just the Look
Different cladding materials handle weather very differently, and the right choice depends on climate as much as taste. Fibre cement resists moisture, insects, and impact, and stays dimensionally stable where timber can swell and vinyl can warp. Brick is durable for a century or more when its cavity and weep holes are kept clear, but it needs a drained cavity behind it and through-wall flashing that lasts as long as the wall itself.
Timber cladding can last decades when it is detailed to dry, with gaps at the ends, a ventilated cavity, and a finish that is maintained. Vinyl is low maintenance but can crack in cold weather and warp in heat, and it hides problems well, which is not always a virtue. Whatever the material, the detailing matters more than the product: clearances above grade, sealed end cuts, proper fastening, and a finish that is renewed on schedule will do more for durability than choosing the most expensive board on the shelf.
Sealing Joints, Penetrations, and the Bottom of the Wall
Once the big layers are right, the small gaps decide whether the wall stays dry. Seal around windows and doors with a flexible, paintable sealant, but remember that sealant is a supplement to flashing, not a replacement for it. Seal penetrations such as pipes and cables with a proper escutcheon or a flashing boot, and check them every year, because the sealants that protect a wall are the parts that age fastest.
The bottom of the wall deserves special attention. Keep the cladding at least 15 centimetres above the ground, keep mulch and soil from touching it, and make sure splash from rain hitting the ground does not soak the lowest boards. In masonry walls, keep weep holes open and clear of mortar droppings and debris, because a weep hole that is blocked is a cavity that fills with water. These are five-minute checks, and doing them each spring is one of the highest-value maintenance habits a homeowner can adopt.
Weatherproofing the Whole Wall Assembly, Inside and Out
Durability is not only about keeping rain out. Air leakage carries warm, moist indoor air into the wall cavity, where it condenses on cold surfaces in winter. Sealing the air barrier, taping sheathing joints, and sealing around penetrations on the inside of the wall reduce that risk, and they also cut heating and cooling loss. The air barrier and the weather-resistant barrier often share the same layer, which is one more reason to install that layer carefully.
Insulation belongs in the same conversation. Continuous insulation on the outside of the framing reduces thermal bridging and keeps the sheathing warmer, which reduces condensation risk. In cold climates, the ratio of exterior to cavity insulation matters, and getting it wrong can trap moisture in the wall. If you are adding exterior insulation during a re-cladding project, ask a building professional to check the wall assembly for your climate, because a wall that is warmer and drier lasts longer, but a wall that is sealed on the wrong side can rot faster.
Spotting Wall Trouble Early and Knowing When to Call a Professional
A durable wall still needs watching. Walk around the house twice a year and look for peeling paint, staining below windows, swollen or soft siding, rust streaks from fasteners, and gaps that have opened at joints. Inside, watch for damp patches, bubbling paint, and musty smells near exterior walls, especially below windows and at the corners of rooms. Catching a leak in its first season usually means replacing a piece of flashing; catching it after five years can mean replacing framing.
Call a professional when the damage goes beyond the surface: soft or crumbling sheathing, rot in the framing, a wall that is out of plumb, or leaks that return after a repair. A builder or building envelope specialist can open a small section of wall, find the actual entry point, and repair the layers in the correct order. Do not let anyone seal a leak from the inside only, because that traps the water in the wall and guarantees a bigger repair later.
Final Thoughts: Durable Walls Are Built in Layers, Not Bought in One
Improving exterior wall durability is not a single purchase but a system: cladding that sheds water, a weather-resistant barrier that blocks what gets through, a drainage gap that lets it out, and flashing that guards every opening and junction. Get those layers right, in the right order, and the wall will look after itself for decades with only modest maintenance. Skip one of them, and even the best siding will eventually let water win.
Exterior Wall Durability and Weatherproofing FAQs
How long should an exterior wall last?
A well-built wall assembly can last the life of the house, and masonry walls can last a century or more. Cladding itself usually needs replacement or major renewal every 25 to 50 years depending on the material, but the hidden layers, flashing, and barrier, should be detailed to last as long as the wall they protect.
Can I add a drainage gap to an existing wall without removing the siding?
No, not properly. A drainage gap sits behind the cladding, so creating one means removing the siding, installing battens or a drainage mat, and re-cladding. It is a job to plan alongside a re-cladding or major repair, when the wall is already open.
Is housewrap really necessary under vinyl siding?
Yes. Vinyl siding is a rain screen, not a waterproof layer, and wind-driven rain regularly gets behind it. Housewrap is the secondary drainage plane that catches that water and sends it out, and most building codes require a weather-resistant barrier behind cladding.
What is kick-out flashing and why does it matter?
Kick-out flashing is a small angled piece of metal at the bottom of a roof-to-wall junction that diverts roof water into the gutter. Without it, water runs down the wall, soaks the siding and sheathing, and can rot the wall in a few seasons. It is a small, cheap piece that prevents a large, expensive repair.
How often should I inspect the flashing around my windows?
Inspect it at least once a year, ideally in spring, and after any major storm. Look for gaps, cracked sealant, rust, and staining below the windows. Flashing itself lasts a long time when installed well, but the sealants around it age and need renewal.
Does painting or sealing brick make it more durable?
Not usually, and it can make things worse. Paint and some sealers trap moisture inside the brick, which then freezes and spalls the face off. Brick needs to breathe and drain through its cavity and weep holes, so leave it unpainted unless a masonry specialist advises otherwise for your specific wall.