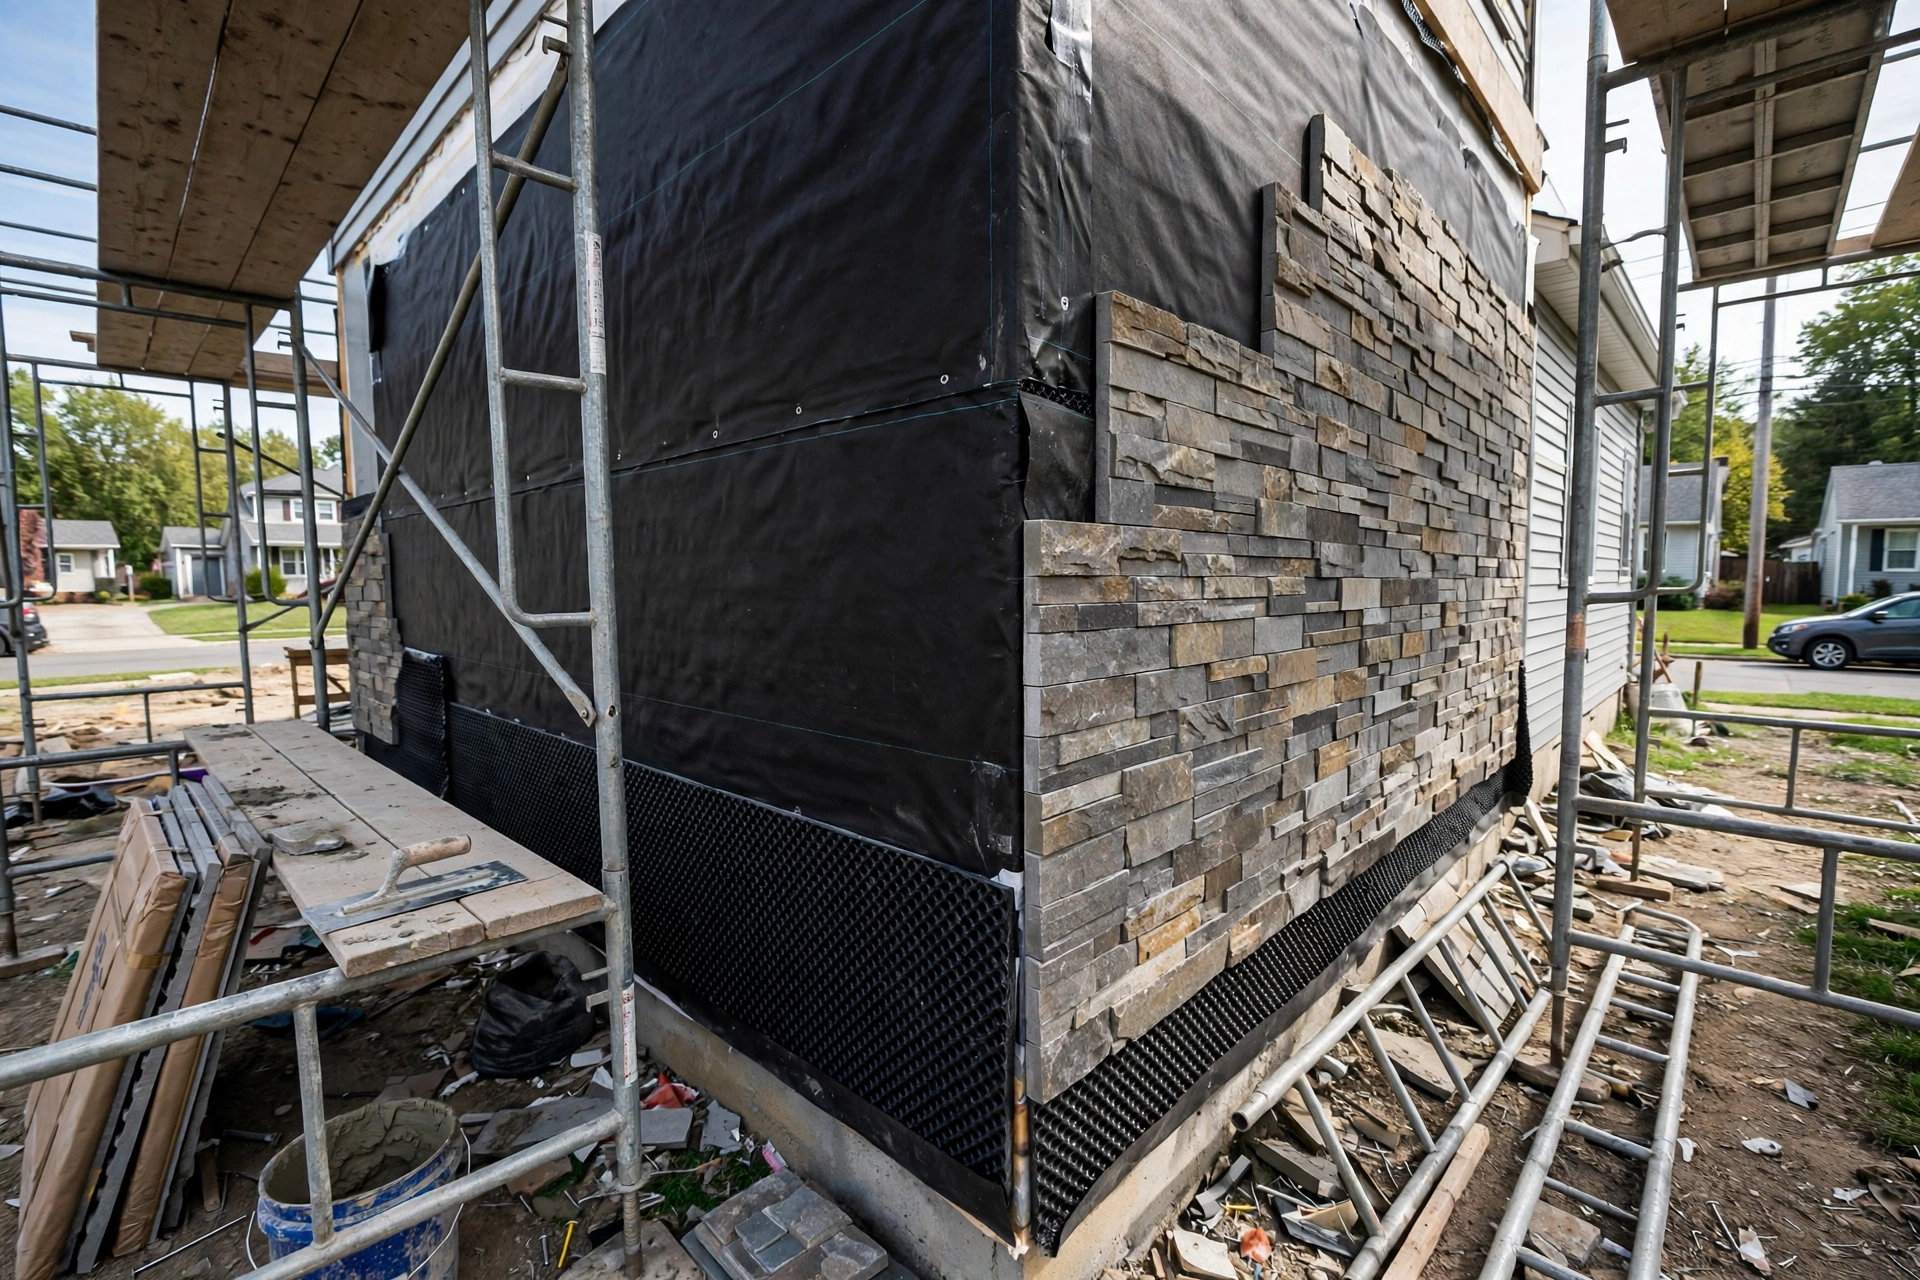
Stone veneer gives a home the look of solid masonry at a fraction of the weight, but only the face is stone. Behind every adhered stone veneer (also called manufactured stone veneer or AMSV) sits a wall assembly built around one unavoidable fact: water will get behind the cladding. Stone veneer water management is not about stopping every drop of rain — it is about giving entering water a controlled path back out before it reaches the sheathing, framing, and insulation.
The direct answer: assume water will penetrate the stone and mortar, then manage it — two layers of WRB or a drained rainscreen gap, a weep screed at the wall base, and flashing at every opening, penetration, and roof intersection, lapped with the WRB and sloped outward. One missing or reversed detail traps water against the sheathing, causing rot and mold long before anything looks wrong outside.
How Water Gets Behind Stone Veneer
Stone veneer, like stucco and brick, is water-resistant, not waterproof. Two entry routes matter most.
Wind-Driven Rain and Joint Absorption
Manufactured stone is a porous concrete product, and mortar joints absorb water too. During wind-driven rain the whole surface can saturate, pushing water through hairline cracks, open joints, and the bond line between stone and scratch coat. A soaked veneer holds water against the wall for hours, so the assembly behind it must drain and dry even when wet.
Penetrations, Openings and Movement Joints
The second entry route is through every hole in the cladding: windows, doors, hose bibs, lights, vents, and utility entries. Inspectors find most water-intrusion damage at these openings, where flashing is most often skipped or poorly lapped. Joints where stone veneer meets a different cladding are another weak point; without backer rod, flexible sealant, and proper flashing, water runs straight into the wall.
The Drainage Plane: Why Two Layers of Water-Resistive Barrier Matter
Over wood framing, codes and the veneer industry require two layers of water-resistive barrier (WRB) behind adhered stone veneer. The mortar scratch coat bonds loosely to the outer WRB layer, leaving no drainage space — without a second layer, penetrating water sits against the sheathing. The gap between the two layers gives it a path down to the weep screed.
The 2021 International Residential Code (Section R703.12) requires a drainage gap plus a code-compliant WRB behind manufactured stone veneer, a response to documented moisture failures. A drainage mat can substitute for the second WRB layer under some codes; either way, the wall needs a continuous drainage plane.
- Protect the WRB during construction. It repels water briefly but is not waterproof — inspect for tears before lath goes on and get the veneer up promptly.
- Lap correctly. Upper layers lap over lower layers, 16 inches around corners. Reverse lapping at a window head is a classic defect.
Drainage Mats and Rainscreen Gaps: Creating a Way Out
A drainage mat between the WRB and the metal lath creates an air gap that lets water drain and air circulate, greatly improving drying. Effective systems use a gap of 3/16 inch (5 mm) to 3/4 inch (19 mm).
Most contractors favor a 9.5 mm (3/8 inch) fluted polymer mat with bonded filter fabric facing the scratch coat, which keeps wet mortar from blocking the drainage plane. Sheets butt tight with fabric lapped; self-furring lath over the mat lets the scratch coat encase it.
- Flash first, mat second. Barrier, flashing, and weep screeds go on before the drainage mat, so entering water always finds an exit.
Weep Screeds and Base-of-Wall Drainage
A weep screed at the base of the veneer terminates the lath and scratch coat and gives drained water an exit. Install it before the WRB so the WRB laps over its nailing strip, keeping moisture away from the framing’s base plate.
Use galvanized metal screed at least 26 gauge (0.018 inches) thick, or plastic at least 0.05 inch thick, extending 3.5 inches up the wall. Keep 4 inches above finished grade and 2 inches above hard surfaces. Never extend stone below the screed or bury it — trapped moisture at the wall base fails walls fast.
Flashing Details That Make or Break Stone Veneer Water Management
Flashing decides whether a veneer wall lasts decades or fails in a few years. Every flashing must be corrosion-resistant, lapped with the WRB, and sloped so water drains over the face of the veneer, never into the wall.
Window and Door Head Flashing
Install metal or self-adhered membrane flashing above every window and door, extending at least 4 inches beyond each side and sloping outward so water sheds over the veneer face. The WRB above must lap over the flashing’s top edge, and end dams at each end stop water running off the sides. Missing or reverse-lapped head flashing is a common defect in failed veneer walls.
Roof Intersections and Kick-Out Flashing
Where a roof meets a stone veneer wall, step flashing runs up the intersection and a kick-out flashing at the bottom diverts runoff into the gutter. Without it, roof water pours behind the veneer — one of the most destructive failure points in residential construction. Start with peel-and-stick flashing folded into the corner, then a large one-piece kick-out, then step flashings with shingles laced between them.
Penetrations, Pipes and Hose Bibs
Hose bibs, light fixtures, dryer vents, and utility entries are easy-to-miss entry points — flash or seal each with WRB-compatible sealant. Where veneer meets a dissimilar material, install a metal J-bead with a gap finished with backer rod and sealant, and add a weep screed above small roof sections like rake returns.
Scratch Coat, Lath and Bond Details That Affect Moisture Performance
All lath and accessories must be corrosion-resistant (galvanized or stainless steel, or evaluated nonmetallic lath) and installed per ASTM C1063. Self-furring lath holds the mortar off the WRB or mat so the scratch coat fully encases the metal, improving bond strength and slowing corrosion.
Let the scratch coat cure 24 to 48 hours before setting stone, and mist it in hot or dry weather. A scratch coat that dries too fast cracks and weakens, and those cracks become water paths. Respect the 2-5/8 inch maximum veneer thickness; heavier stones overload the bond mortar and debonded stones open direct water paths.
Ground Clearance, Grading and Wicking Moisture
Veneer at or below grade suffers rising damp: moisture wicks upward through masonry pores, reportedly up to 40 to 50 inches. Maintain 4 inches of clearance above finished grade and 2 inches above paving. Slope soil away from the foundation, keep sprinklers and gutter discharge off the wall base, and hold vegetation back.
How to Inspect Stone Veneer for Hidden Water Problems
The worst damage happens out of sight, so inspect for surface clues and hidden moisture — starting at windows, doors, hose bibs, and lights.
- Discoloration. Stone darker than surrounding areas, especially below windows or at roof intersections, signals chronic wetting.
- Efflorescence. White salt deposits from water moving through masonry to the surface — often a sign of moisture behind the wall.
- Loose or hollow stone. Tap veneer units; hollow sounds or give suggest bond mortar compromised by water.
- Failing joints. Cracked, crumbly, or missing mortar and failed sealant at openings admit water.
- Spalling. Flaking faces and growing cracks, especially in freeze-thaw climates, indicate water entering and expanding in the masonry.
- Clearances and flashing. Confirm 4-inch grade clearance, 2-inch above paving, visible weep screeds, and kick-outs.
- Indoor clues. Water stains on interior walls adjacent to veneer, especially around windows, often reveal hidden penetration.
Professionals also use invasive moisture probing: 1/4-inch holes through mortar joints measure sheathing moisture, then get sealed with ASTM C920-grade sealant. Moisture meters and infrared cameras reveal wet areas the eye cannot see.
Repair and Retrofit Options When Water Damage Is Found
Targeted repairs fix a single defect: a missing kick-out flashing, a failed window perimeter resealed with backer rod and sealant, or repointed mortar joints — sensible when probing shows the sheathing is dry.
Partial wall rebuilds apply when probing finds wet sheathing in one area: remove the veneer there, replace damaged sheathing and framing, fix the WRB, drainage mat, and flashing, then reset new veneer. Full wall remediation — stripping the veneer across the whole elevation and rebuilding the drainage system — is the only reliable fix for widespread trapped water.
- Never seal over a wet wall. Re-caulking or painting the veneer without fixing the drainage path traps moisture inside.
- Fix the water source first. Correct gutters, downspouts, grading, and sprinklers with the wall repair or the new work fails the same way.
- Document before demolition. Photos, moisture readings, and an inspector’s report help with contractor scopes, insurance questions, and resale disclosure.
What Stone Veneer Water Repairs Cost
Costs vary by region, wall size, access, and hidden damage, so treat all figures as rough estimates, not quotes. Published 2025 national figures put typical water damage restoration at a few thousand dollars on average: roughly $3 to $7.50 per square foot for mitigation and $20 to $37 per square foot for full repair and reconstruction.
Get two or three detailed written estimates, and confirm each includes sheathing and framing replacement if needed — the cheapest bid often assumes the structure behind the veneer is sound.
Common Mistakes to Avoid
- A single WRB layer over wood framing as the only defense, instead of two layers or a rainscreen system.
- Skipping the weep screed or burying it at grade — removing the wall’s only water exit.
- Reverse-lapping WRB over head flashing, directing water into the wall instead of over the veneer.
- Omitting kick-out flashing — the single most destructive shortcut.
- Running veneer to or below grade, inviting rising damp and voiding warranties.
- Caulking weep screed openings shut, trapping drained water inside.
- Unflashed transitions where stone meets another cladding.
Safety and When to Call a Professional
Keeping grade clear and cleaning gutters is safe DIY work. Investigating water intrusion, removing adhered veneer, and repairing WRB, flashing, and sheathing are not: veneer units are heavy and can fall if debonded, and repairs often reveal rot or mold needing containment. Hire a building envelope inspector or an experienced adhered-veneer contractor when you see staining, efflorescence, loose stone, or interior water marks. Repairs exposing sheathing, framing, or mold belong to licensed professionals.
Final Thoughts
Stone veneer fails when water gets in and cannot get out. The preventing details are straightforward: a continuous drainage plane, a drained rainscreen gap, weep screeds at every wall base, head flashing with end dams above every opening, kick-out diverters at every roof intersection, and clearances above grade. Inspect your veneer for the warning signs above — catching a missing flashing detail early is a modest repair; finding rotted framing years later is not.
Frequently Asked Questions
Does stone veneer need a drainage plane?
Yes. Over wood framing, adhered stone veneer needs two layers of WRB or a drainage mat creating a 3/16 to 3/4 inch rainscreen gap — the 2021 International Residential Code requires a drainage gap plus a code-compliant WRB behind manufactured stone veneer. The drainage plane carries water down to the weep screed.
How do I know if water is getting behind my stone veneer?
Watch for darker stone below windows or at roof intersections, white efflorescence, crumbling mortar, loose or hollow stones, spalling faces, and interior stains near veneer walls. Professional moisture probing through mortar joints is the most reliable confirmation.
What is a weep screed and does my stone veneer need one?
A weep screed is a metal or plastic strip at the veneer base that terminates the lath and scratch coat and lets drained water exit. Use a galvanized screed at least 26 gauge thick, extending 3.5 inches up the wall, at least 4 inches above grade and 2 inches above hard surfaces, with the WRB lapped over it.
Where is kick-out flashing required on a stone veneer wall?
Kick-out flashing is needed at the bottom of every roof-to-wall intersection where the wall continues past the roof edge, diverting runoff into the gutter. It also matters where a gutter terminates at a chimney. Missing kick-out flashing is a leading cause of severe hidden water damage.
Can stone veneer be installed over a single layer of house wrap?
Not over wood framing without a drainage system. Two WRB layers are required because the scratch coat bonds to the outer layer and leaves no drainage path. A single WRB works only with a code-compliant drainage mat providing the gap; over concrete or CMU, a WRB is generally not needed.
What causes efflorescence on stone veneer?
Water moving through the masonry carries dissolved salts to the surface, leaving a white powdery residue when it evaporates. Mostly cosmetic, but it means water is traveling through the wall — a warning sign of moisture behind the veneer.
Can you fix water damage behind stone veneer without removing the whole wall?
Sometimes. If damage is confined to one area, a partial rebuild works: remove the veneer there, replace damaged sheathing and framing, fix the WRB and flashing, and reinstall. But widespread wet or rotted sheathing needs full wall remediation — sealing over damaged structure guarantees the problem returns.