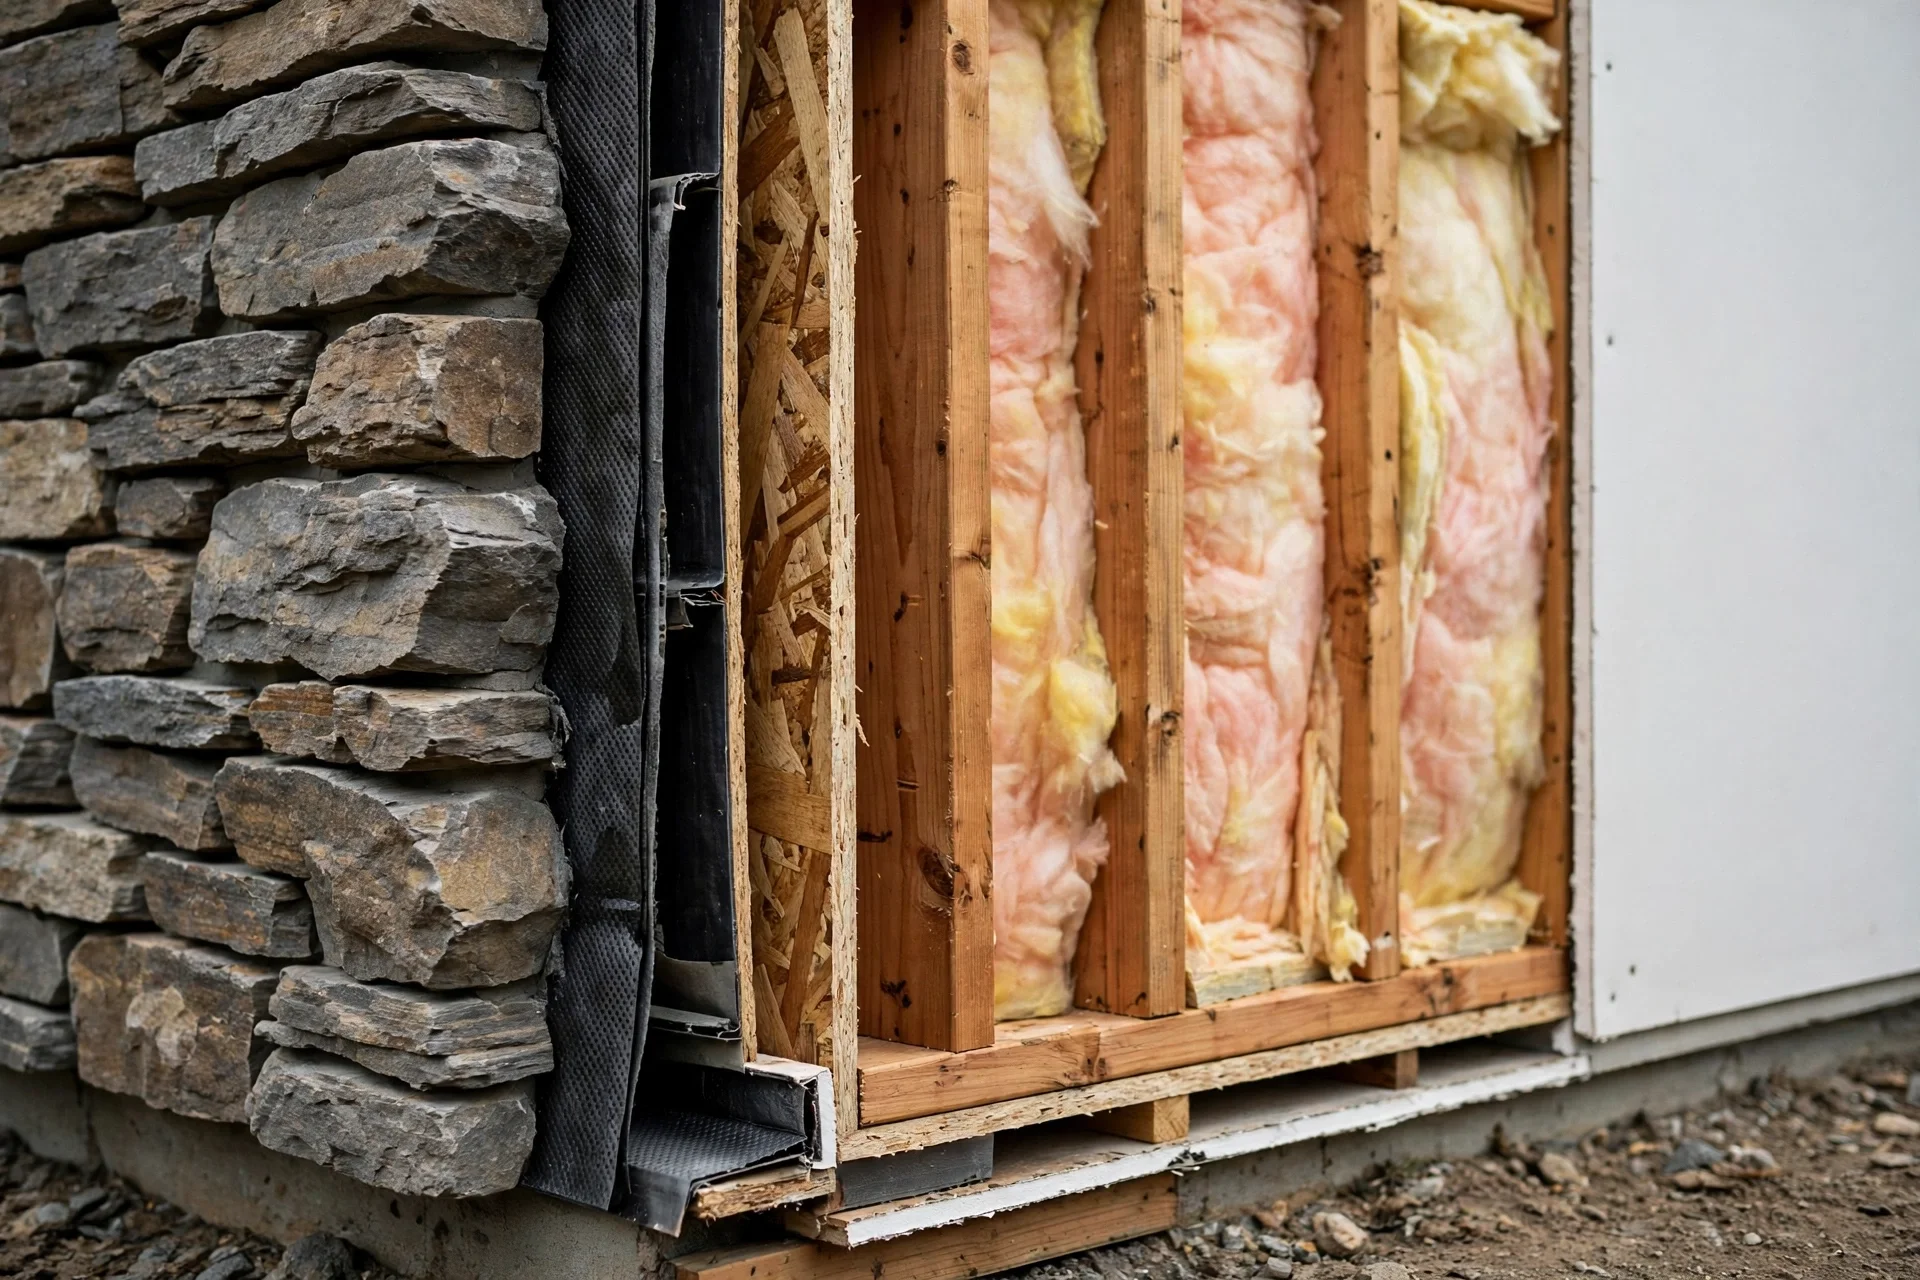
A beautiful façade can hide a failing wall. Stone veneer, decorative stucco, fibre-cement panels, and metal cladding all look solid from the street, but none of them is perfectly waterproof — wind-driven rain passes joints, laps, and penetrations, and once water is behind the finish it needs somewhere to go. The drainage plane is that somewhere: a designed, continuous path that catches water behind the cladding, carries it downward, and discharges it outside before it can reach the structure. The short answer is that a durable decorative wall is a water-management system first and a finish second, built from three layers — cladding that sheds most rain, a cavity that drains and dries, and a weather-resistive barrier that protects the structure — tied together by flashings that give the water an exit.
Why Decorative Finishes Trap More Water Than Plain Ones
The risk is not just the water that gets in; it is the water that cannot get out. A decorative finish fixed tight against the sheathing leaves no gap for drainage and no air for drying, so water that penetrates the face sits against the structure, soaking sheathing and insulation for weeks. In a cold climate, trapped water freezes and expands, prying joints open further and accelerating the damage. The finish looks perfect while the wall behind it decays, which is why the drainage plane matters more, not less, as finishes become more decorative.
How a Drainage Plane Moves Water Out From Behind the Finish
Three details make the system work. First, the cavity must be continuous and clear: any mortar droppings, insulation squeezed into the gap, or debris at the base turns the drainage path into a dam. Second, the WRB must be continuous across every transition — wall to floor, wall to roof, around windows and penetrations — because a gap in the barrier is a gap in the plane. Third, the flashings must discharge outward, not into the wall: a flashing that terminates inside the cavity pours collected water back against the structure it was meant to protect.
The Three Layers Every Drained Wall Needs
The layers must be designed as a system, not selected independently. A heavy stone veneer needs a wider cavity and a stronger WRB than a light fibre-cement board; a stucco finish needs a drainage mat that holds the cavity open against the weight of the render; a metal panel system needs a ventilated cavity that also handles condensation on the back of the panels. The wall designer should coordinate the cladding, the cavity, the barrier, and the flashings together, and should never copy a cavity detail from a different cladding profile or a different climate.
| Layer | Job in the wall | What failure looks like |
|---|---|---|
| Outer cladding | Sheds most wind-driven rain | Open joints admit water faster than the cavity can drain |
| Drainage cavity | Separates, drains, and ventilates | Blocked cavity stores water against the structure |
| Weather-resistive barrier | Catches water and sheds it downward | Torn laps or gaps let water reach sheathing |
| Flashings and weeps | Discharge collected water outside | Water trapped at transitions rots framing unseen |
Cavity Depth, Ventilation, and the Drying Question
Cavity depth is a practical compromise. A gap of around 10 millimetres is the common minimum for most wood, fibre-cement, and metal sidings, often formed with vertical furring strips or a drainage mat, and wider gaps are used behind heavier finishes such as stone veneer. Too shallow, and capillary action bridges the gap or debris blocks it; too deep, and the cladding fixings become long and the detailing at windows and corners gets complicated. The right depth is the one the cladding manufacturer and the wall designer agree on for that finish, that climate, and that exposure — not a number copied from another project.
Ventilation helps the cavity dry, but it does not replace drainage. Air movement behind the cladding carries away residual moisture vapour after rain, which is why ventilated cavities dry faster than sealed ones. But air movement cannot remove bulk water: a wall with trapped liquid water has a drainage problem first, and no amount of ventilation will fix a blocked cavity or a missing flashing. Keep the order clear in every design decision — shed most rain at the surface, drain the water that gets behind it, then support drying.
- Keep the cavity clear — mortar, debris, and squeezed insulation are the usual blockages.
- Ventilate top and bottom — air enters low, leaves high, and carries moisture with it.
- Screen the openings — insect mesh stops nesting without blocking air or water.
- Mind the base — the bottom of the cavity must drain freely, never sit in soil or paving.
- Match depth to finish — stone needs more room than fibre cement; check the system, not the habit.
A drained cavity and a pressure-equalised rainscreen are related but not identical. A drained and back-ventilated system accepts water into the cavity and relies on drainage and drying to remove it, while a pressure-equalised rainscreen compartments the cavity and controls openings to reduce the pressure difference that drives rain inward. Both need a continuous WRB and working flashings; neither works if the cavity is blocked or the barrier is torn.
Stucco, Stone, and the Finishes That Punish Bad Detailing
Stucco is the finish most often found behind drainage-plane failures, and the reason is its honesty problem: it looks monolithic, so builders and owners assume it behaves like a waterproof skin. It does not. Hairline cracks open with seasonal movement, water enters, and because there is no visible joint to show the entry point, the water can travel a long way before the damage appears. A stucco wall without a drainage mat or a proper cavity is a wall that stores water against its own sheathing, and the repair usually means removing the stucco to find the rot.
Stone veneer punishes a different mistake: weight and water together. Mortar droppings fall into the cavity during installation, bridge the gap, and hold water against the WRB. A veneer installed without a clear cavity, without weep holes at the base, and without flashing at every step in the foundation becomes a moisture trap dressed as a luxury finish. Metal panels and fibre-cement boards are more forgiving, but only when their joint sealants are maintained — a sealant joint that fails on a panel system admits water at exactly the place where the cavity is narrowest.
Flashings: The Exits Without Which the Plane Fails
Flashings are directional control components, not decorative trims, and they decide whether a drainage plane works or fails. Every horizontal interruption in a wall needs one: the base of the cladding, the head and sill of every window, the top of every foundation step, and every roof-to-wall junction. Each flashing must collect the water running down the WRB and discharge it outward, past the face of the cladding, through a weep or a drip edge. A flashing that ends flush with the cladding, or that is blocked by trim, sealant, or landscaping, traps the water it was installed to remove.
The most damaging flashing error is the one that looks tidy: a flashing lapped the wrong way, so the upper layer drains behind the lower one instead of over it. Water follows gravity and the lap, and a reversed lap is a funnel into the wall. The rule for every joint in the drainage plane is shingle-fashion — each layer above overlaps the layer below, so water always stays on the outside of the barrier. Check the laps during construction, while they can still be seen, because after the cladding goes on they are hidden for the life of the wall.
- Base flashing — drains the whole wall; keep its weeps clear of soil and paving.
- Window head flashing — sheds water over the opening, not into the reveal.
- Sill flashing — carries water out past the cladding face at every window.
- Step flashing at foundations — follows each step down and discharges at every level.
Weep holes deserve the same respect as the flashings they serve. In masonry veneer, weeps at the bottom course, spaced no more than about 600 millimetres apart, are the visible evidence that the cavity can drain. A wall with no weeps, or with weeps filled by mortar during construction, is a wall whose drainage plane ends in a dead end. Clear the weeps, check them every year, and treat a weep that never drips after rain as a warning rather than a comfort.
Retrofitting a Drainage Plane Behind an Existing Finish
Adding drainage to an existing wall is a bigger job than building it in from the start, but it is often the only cure for a wall that keeps getting wet behind a sound-looking finish. The usual retrofit removes the cladding in the affected area, inspects the sheathing and framing for rot, installs a continuous WRB and a drainage mat or furring strips to recreate the cavity, adds flashings at the base and around openings, and reinstates the finish. The work is disruptive and it is not cheap, which is why the inspection that proves the need must be thorough before the first board comes off.
A less invasive option works where the finish is sound and the problem is local: targeted repairs at the failed detail. Re-flashing a window head, clearing a blocked cavity base, or opening weeps that were mortared shut can restore drainage without removing the whole elevation. The key is diagnosis before demolition — moisture readings, an infrared scan, and a careful look at the flashings will usually show whether the failure is a single detail or a system-wide absence of drainage. Fix the detail where the detail is the problem; rebuild the system where the system is missing.
Blocked Cavities and the Moisture-Storage Trap
A blocked cavity converts a drainage system into a moisture-storage system, and that conversion is the single most destructive failure in a decorative wall. Water enters through a joint, finds the cavity blocked by mortar droppings or compressed insulation, and sits against the WRB or the sheathing long enough to cause concealed deterioration. The façade stays visually perfect while the sheathing softens, fasteners corrode, and mould grows behind the finish. By the time the damage appears inside, the repair involves the whole elevation.
Prevention is a construction-site discipline, not a product. Keep mortar out of the cavity during veneer work, use drainage mats that hold the gap open under load, inspect the cavity base before the cladding closes it, and photograph the open cavity at every elevation. Those photographs are the record that proves the drainage plane exists — and the first thing a forensic investigator asks for when a decorative wall fails.
When a Wall Assembly Specialist Should Be Called In
Call a building envelope specialist or a wall assembly consultant when a decorative wall keeps getting wet despite repairs, when the finish must be removed to inspect the structure, or when a retrofit drainage plane is being designed for a complex façade. The specialist brings moisture diagnostics, a knowledge of the cladding system’s tested details, and the ability to write a repair scope that a contractor can price — and, just as importantly, to say when the finish can stay and only the detail needs fixing.
Before the specialist arrives, gather the evidence: photographs of the façade, the moisture readings, the dates the damage appeared, and any drawings or specifications from the original build. A specialist who can see the history will diagnose faster and cheaper than one who starts from a single damp patch. Ask for the report in writing, with the cause, the repair sequence, and the details that must change, so the next contractor is not guessing at the same wall.
Exterior Wall Drainage Plane FAQs: Cavities, Flashings, and Finishes
How can I tell if my wall has a drainage plane?
Look for the evidence from outside: weep holes at the base of masonry veneer, a visible gap or shadow line behind the cladding, and flashings that discharge past the finish at windows and at the wall base. From inside, a moisture meter reading that stays normal after rain suggests the plane is working. The certain answer comes from the original drawings or from a small inspection opening — a specialist can confirm it without removing the whole elevation.
Why does water get behind cladding that looks perfectly sealed?
Because no cladding is perfectly sealed under real weather. Wind-driven rain passes joints, laps, and penetrations, and condensation can form on the back of the cladding itself. A drained wall assumes this will happen and manages the water; a wall without drainage assumes it will not, and stores the water instead.
How wide should the cavity behind decorative cladding be?
Around 10 millimetres is the common minimum for most siding types, formed with furring strips or a drainage mat, with wider gaps behind heavy finishes such as stone veneer. The correct depth depends on the cladding system, the climate, and the exposure, so follow the manufacturer’s tested detail rather than copying a number from a different wall.
Can a drainage plane be added without removing the whole finish?
Sometimes. Where the problem is a single failed detail — a window flashing, a blocked cavity base, or sealed weeps — targeted repair can restore drainage. Where the whole elevation lacks a cavity or a continuous barrier, the finish must come off in the affected area so the layers can be rebuilt properly.
Do flashings matter more than the cladding material?
For water management, yes. The finest cladding in the world fails if its flashings do not discharge water outward, and a modest cladding lasts decades when its flashings are right. Flashings are the exits of the drainage plane; without them, the plane is a reservoir, not a system.
Final Thoughts: The Wall You Cannot See Decides How Long the Finish Lasts
Decorative finishes earn their keep by looking good for decades, and they only do that when the wall behind them stays dry. The drainage plane — cladding, cavity, barrier, and flashings working together — is the part of the wall nobody sees and everybody depends on. It costs little to build in, it costs a great deal to retrofit, and it costs the most of all to live without, because the damage it prevents is the damage that hides longest.
If your home wears a decorative finish, find out whether a drainage plane sits behind it. Look for the weeps, check the flashings, read the drawings if you have them, and ask a specialist if you do not. The façade will keep looking good either way — the difference is whether the wall behind it is quietly lasting or quietly failing.