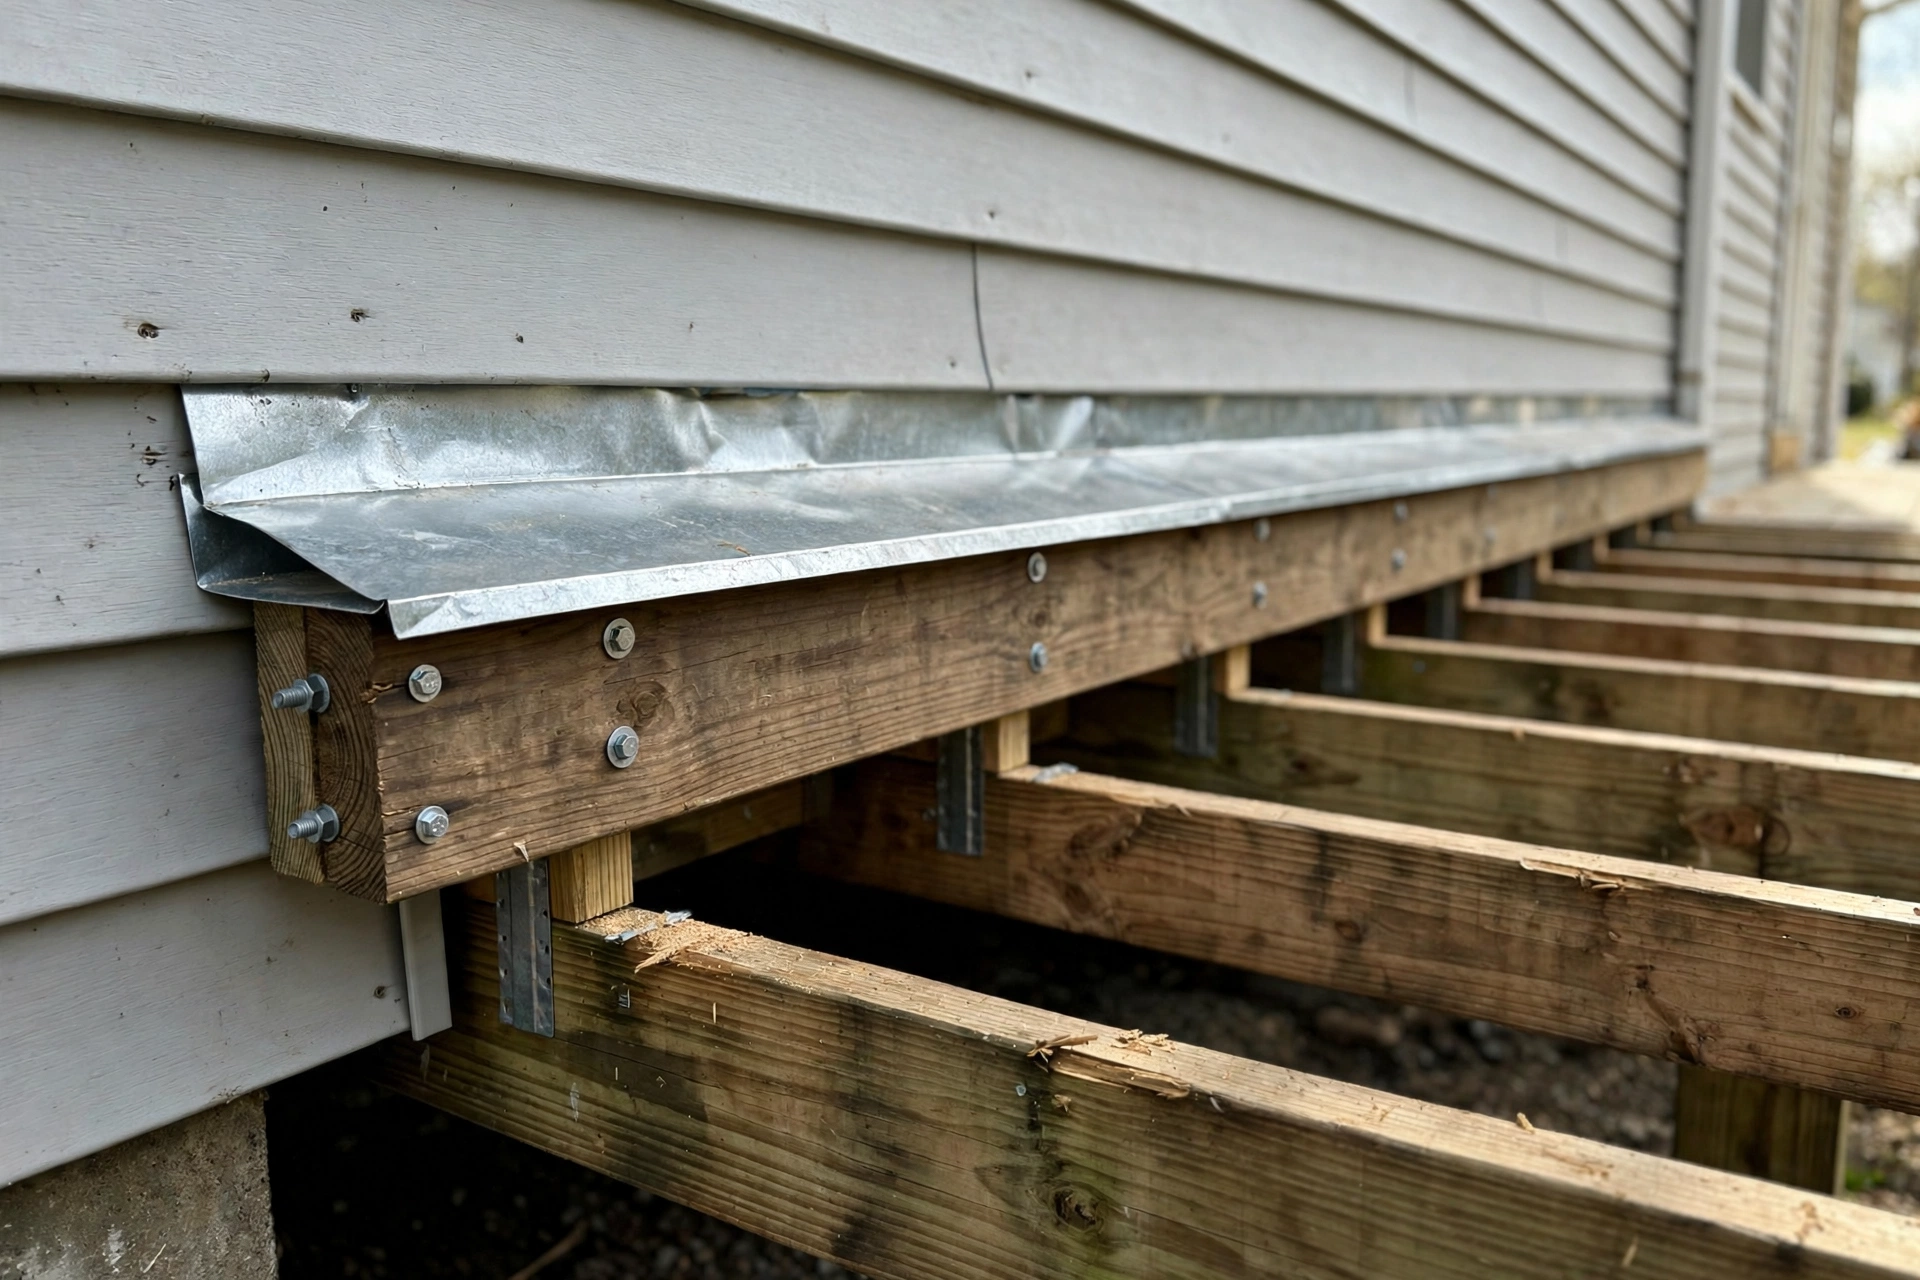
Every attached deck has one joint that decides whether the wall behind it stays dry or slowly rots: the ledger board, the horizontal board bolted to the house that carries half the deck's weight. Rain runs down the siding, hits that joint, and — if the flashing is missing, backward, or made from the wrong metal — slips behind the board and sits against the sheathing and rim joist, often undiscovered for years.
The direct answer: protect a deck ledger with layered flashing that works like shingles. A self-adhering membrane goes on the sheathing behind the ledger first, the ledger is bolted through it into the house rim joist, and a corrosion-resistant metal Z-flashing caps the top of the ledger with its upper leg tucked behind the water-resistive barrier above. Every layer must overlap the one below it so gravity carries water outward, never inward.
How Rain Reaches the Rim Joist Behind an Unflashed Ledger
A ledger board is not just trim. It transfers the deck's live load — people, furniture, snow — into the house framing, typically the rim joist at the floor system's edge. That structural role is why moisture here is so dangerous: rot weakens the very member the deck hangs from, and water intrusion is the leading cause of ledger failures.
Water reaches the joint through ordinary paths: rain crosses the ledger's top edge, wind-driven rain pushes into the ledger-siding gap, and snow piled against the wall melts into the seam. Once behind the ledger, a tight fit traps water with no airflow to dry it, and the rim joist, sheathing, and ledger back stay damp until decay takes hold.
That is why flashing is not optional. Under the International Residential Code (IRC Section R507.9.1.5) and the American Wood Council's DCA6 deck guide, flashing at deck ledgers is a code requirement — no current code allows a bare ledger-to-siding joint on a new attached deck.
The Shingle Rule: Why Ledger Flashing Layers Must Overlap Downward
Every flashing method in this article follows one principle: upper layers lap over lower layers, the way roof shingles do. Water obeys gravity, so any seam where an upper piece sits behind a lower piece becomes a funnel into the wall.
From the wall outward, the sequence is: sheathing, water-resistive barrier (WRB, commonly house wrap), self-adhering membrane in the ledger zone, ledger board, metal cap flashing over the ledger's top edge, and siding above lapping over the flashing's upper leg. Reversing even one lap defeats the whole system.
Two details make the shingle rule work in the field. First, laps at flashing seams should be at least 3 inches, sealed with a sealant compatible with the metal. Second, the cap flashing's bottom edge should kick outward slightly, forming a drip edge so water falls free of the ledger face.
Membrane-First vs. Metal-First: Two Deck Ledger Flashing Approaches Compared
Builders generally use one of two strategies, and the best jobs combine both. The membrane-first approach relies on a self-adhering membrane — a peel-and-stick butyl or bituminous sheet — applied to the sheathing across the full ledger zone before the ledger goes up, sealing around fastener penetrations. The metal-first approach relies on rigid flashing — usually a pre-bent Z-profile in galvanized steel, copper, or vinyl — to divert bulk water over the ledger. Rigid flashing handles heavy water and snowmelt better, but it cannot seal fastener holes.
The comparison below shows why most durable details use membrane behind the ledger and metal over the top, rather than choosing one or the other.
A third element often joins them: standoff spacers or washers holding the ledger roughly one-half inch off the wall, creating a drainage and drying channel. Spacers are not a substitute for flashing, but on walls facing frequent wind-driven rain they help.
A Layer-by-Layer Deck Ledger Flashing Sequence You Can Follow
Flashing only works in order. The sequence below follows the IRC and DCA6 approach. Read it fully before removing siding or drilling, because several steps cannot be redone without taking the ledger back down.
Inspect the existing house wrap and sheathing. Remove siding in the ledger zone and inspect the sheathing and WRB. Repair soft sheathing and torn wrap first.
Apply self-adhering membrane to the sheathing. Apply self-adhering membrane across the full ledger footprint, extending several inches past each end and edge, lapping seams shingle-style.
Add bottom flashing where cladding sits below. If the wall below the ledger is clad, add bottom flashing at the ledger's lower edge so draining water exits over the cladding below.
Bolt the ledger through the membrane. Set spacers or washers at each fastener location if your detail uses them, then fasten the ledger through the membrane into the rim joist with hot-dip galvanized or stainless-steel through-bolts or structural screws at code spacing. Nails and ordinary deck screws lack the holding power a ledger needs.
Cap the ledger with metal Z-flashing. Install metal Z-flashing over the ledger's top edge, sliding its upper leg behind the WRB above and its lower leg over the ledger face with a slight outward kick. Lap seams 3 inches and seal them.
Tape the flashing and lap the WRB over it. Apply flashing tape over the metal flashing, then lap the WRB down over it and seal the joint. This last lap is the one most often skipped.
Reinstall siding over the flashing. Reinstall siding so it laps over the flashing, never butting tight against the ledger. Seal fastener penetrations with compatible sealant, leaving the bottom edge open to drain.
One more caution: the ledger must anchor into the rim joist, never into siding or sheathing alone. Where the framing cannot provide a solid rim joist, build a freestanding deck on its own posts instead.
Siding, Brick, and Stucco: Adapting Ledger Flashing to Your Exterior Wall
The layering principle never changes, but the tuck-in detail depends on the cladding. With vinyl or wood siding, remove the courses above the ledger, slip the Z-flashing's upper leg behind the WRB, and reinstall the siding over it, leaving its bottom edge uncaulked. Brick and stone cannot be peeled back, so the flashing leg is typically set into a mortar joint with sealant, or tied to a through-wall flashing exiting the veneer — and since masonry stores water, the membrane behind the ledger matters even more. On stucco and fiber-cement, cut a clean slot for the flashing leg, seal the cut edges, and patch any WRB damaged during cutting with membrane and tape first.
Ledger Flashing Slip-Ups That Quietly Rot the House Frame
Most ledger rot traces back to a short list of errors, nearly all invisible once the deck boards go down.
- Missing flashing. Older decks and some do-it-yourself builds simply bolted the ledger over siding. No metal lip over the ledger's top edge means the joint is unprotected.
- Backward laps. Placing the Z-flashing over the house wrap instead of behind it routes wall water directly behind the ledger.
- Incompatible metals. Copper-based preservatives in treated wood corrode aluminum and thin galvanized steel. Use hot-dip galvanized, stainless, copper, or vinyl flashing rated as compatible, and match fasteners.
- Unsealed seams. A butt joint between flashing pieces is an open door for wind-driven rain; laps of at least 3 inches, sealed, are the standard.
- Open penetrations. Every bolt is a potential water path. Seal penetrations with compatible sealant, and rely on the membrane behind the ledger to seal around them.
- Caulk instead of flashing. Sealant alone is not a flashing system. It ages and cracks, and a joint depending on a bead of caulk will eventually leak.
- Wrong anchorage. Siding compresses, rots, and hides movement; the ledger must bear on the rim joist through solid sheathing.
What Ledger Flashing Materials and Repairs Typically Run
Flashing is one of the cheapest parts of a deck, which makes skipping it hard to justify. The table below gives planning estimates only — prices vary by region, length, and cladding type.
The last row is the point: a few hundred dollars of flashing at build time buys protection against a repair involving removed deck boards, replaced framing, and opened interior walls.
Reading Your Existing Deck for Hidden Ledger Moisture Damage
If your deck is more than a few years old, a short inspection can reveal whether the ledger joint is in trouble before the framing is gone. Do this from underneath the deck where possible, with a flashlight and a screwdriver.
- Check for the cap flashing. Its absence is the single clearest warning sign.
- Probe for soft wood. Wood that yields easily, feels spongy, or shows dark staining is decayed.
- Check both sides of the wall. Look for stains or musty odors on the interior wall behind the deck, and damp patches below the ledger outside.
- Watch for movement. A ledger pulling away from the house, gaps at the joint, or sagging joists near the wall suggest the connection is weakening.
- Trace the water sources. A ledger under a roof valley or failed gutter takes far more water than the detail was designed for.
If probing finds soft framing, do not re-flash over it. Decayed rim joist material must be cut out and replaced, with temporary support for the deck while that happens.
When a Rotted Ledger Moves the Job From DIY to a Structural Contractor
Re-flashing a sound ledger on an accessible wall is within reach of a careful, experienced do-it-yourselfer. The job stops being DIY when the framing is compromised, when the ledger supports concentrated loads such as a beam or roof, when the connection falls outside standard code details, or when permits are required — and most jurisdictions require a permit for ledger replacement. A structural contractor or engineer should also take over if the rim joist is rotted or the deck is pulling away from the wall.
Deck Ledger Flashing Questions Homeowners Keep Asking
Can I flash a deck ledger without removing the siding?
Not properly. The cap flashing's upper leg must sit behind the water-resistive barrier above the ledger, which requires removing the siding courses in the ledger zone. Surface-applied flashing is a temporary patch, not a code-compliant detail.
Does a deck ledger need flashing if the house has house wrap?
Yes. House wrap is a water-resistive barrier, but it is not flashing at the ledger joint. The IRC requires flashing at the ledger regardless of whether a WRB is present, because the wrap alone cannot divert water over the ledger's top edge or seal fastener penetrations.
What flashing metal works with pressure-treated lumber?
Use hot-dip galvanized steel, stainless steel, copper, or vinyl products rated compatible with the preservative in your lumber. Avoid bare aluminum and thin electro-galvanized steel against modern copper-based treated wood, which corrodes them.
How do I know if my deck ledger is already rotting?
Probe the ledger and rim joist from underneath with a screwdriver, look for staining or soft wood, and check the interior wall behind the deck for damp patches or musty odor. Any softness, movement, or gap at the joint needs professional assessment before heavy use.
Is a freestanding deck better than a ledger-attached deck?
A freestanding deck avoids the ledger joint entirely, removing the most failure-prone waterproofing detail on the house. It costs more in posts and footings and needs bracing against sway, but where framing cannot support a ledger it is often the safer choice.
Final Thoughts: Flash the Ledger Once, and the Wall Stays Dry for Decades
Deck ledger flashing is unglamorous work nobody sees once the deck is finished, and that is precisely why it gets skipped. But the joint it protects carries the deck and guards the house frame, so a few hundred dollars of membrane, metal, and careful layering is the best money in the whole project. Follow the shingle rule, use metals compatible with treated lumber, lap the WRB over the cap flashing, and leave the bottom edge open to drain. If your deck has no flashing lip, or probing finds soft wood, act now — a re-flash today is a small job, while a rotted rim joist is a major one.