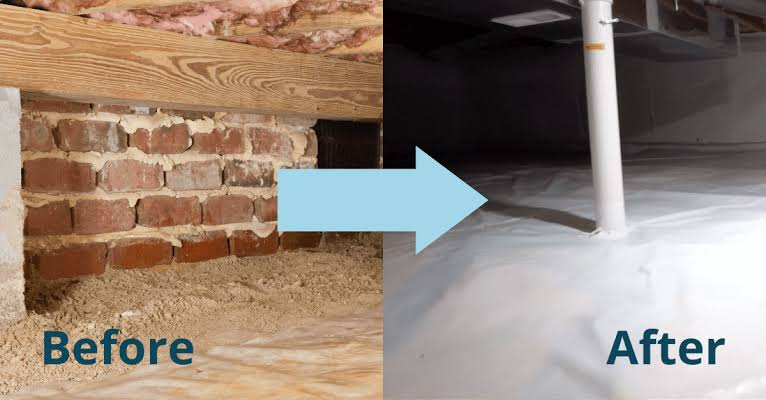
Most homeowners rarely look inside their crawl space until floors feel soft, a musty smell rises through the house, or an inspector finds mould on the joists. By then, ground moisture has usually been at work for years. Encapsulation fixes the cause rather than the symptoms. Instead of leaving the space open to damp soil and humid air, you seal it with a heavy vapor barrier, close the vents, deal with liquid water, and control humidity year-round.
Done properly, encapsulation keeps joists dry, reduces musty odours, makes floors warmer in winter, and can lower energy costs. This guide walks through each method in the right order, with realistic costs and the mistakes that cause good projects to fail.
How Crawl Space Moisture Damages Joists
Wood and moisture are a poor combination. Joists, sill plates, and subflooring stay sound while moisture content remains below about 16 percent. Above 20 percent, wood-decay fungi become active. Fibres soften, fasteners lose grip, and a joist begins to sag, bounce, and eventually rot through at the ends where it sits on the foundation.
Moisture arrives in three ways. Bare soil releases water vapour constantly, even when the surface looks dry. Vented foundations, once required by code, pull in warm humid summer air that condenses on cooler joists and ducts, exactly like a cold glass sweating. Finally, plumbing leaks, poor grading, and roof runoff add liquid water that pools and soaks upward.
The damage is rarely only structural:
- Mould and mildew grow on joist faces and subflooring, and roughly half the air you breathe upstairs can come from the crawl space through the stack effect.
- Damp wood attracts termites and carpenter ants, which prefer softened timber and are harder to spot in a dark, wet space.
- Wet insulation sags from between joists, losing its value and holding moisture directly against the wood.
- Metal hangers, nails, and ducts rust faster, adding further repair costs.
Assessing Your Crawl Space Condition
Encapsulation should never start with buying a liner. Spend an hour measuring and inspecting first, ideally after heavy rain, when problems are easiest to see. Wear a respirator, gloves, and knee pads, and take a flashlight, moisture meter, hygrometer, and phone for photos.
What to Check Before You Start
- Wood moisture: Push a pin moisture meter into several joists and sill plates. Readings above 16 percent confirm an active problem to dry and treat before sealing.
- Standing water and staining: Look for puddles, tide lines on piers, efflorescence (white crust) on block walls, and mud patterns showing where water enters.
- Rot and pests: Probe suspect wood with a screwdriver. Sound wood resists; rotted wood feels spongy and flakes. Check for termite tubes on piers and foundation walls.
- Existing problems: Note fallen insulation, plumbing leaks, dryer vents discharging into the space, and unsealed duct joints. Fix leaks and remove debris and old plastic before new work.
If several joists are deeply rotted or the floor sags, get a structural repair quote first. Encapsulation protects sound wood; it does not restore lost strength. A professional assessment typically costs $150 to $300.
Vapor Barrier Installation
The vapor barrier, or liner, is the heart of the system. It covers the entire floor and runs up the foundation walls, cutting off ground moisture at source. Thickness matters more than almost any other choice. Cheap 6-mil sheeting punctures on gravel, tears at seams, and often needs replacing within a few years. Most professionals use 12-mil to 20-mil reinforced polyethylene. For a 1,200 sq ft crawl space, materials run about $600 to $1,500 depending on thickness.
Installing the Liner Correctly
- Overlap seams by at least 12 inches and seal every seam with compatible seam tape. Unsealed overlaps are the most common DIY failure.
- Run the liner 6 to 12 inches up walls and piers, fastening it with termination bars and sealing the top edge. Leave a 3-inch inspection gap at the top where termite checks are required.
- Wrap each pier individually rather than bridging over it, and cut carefully around plumbing and supports, sealing each penetration.
- Use a white or light-coloured liner. It brightens the space, makes leaks and pest activity obvious, and discourages you from ignoring the space for another decade.
Work in sections, rolling the liner out rather than dragging it, and keep a patch kit on hand for punctures.
Sealing Vents and Gaps
A liner alone will not help if humid air still pours in. Seal foundation vents from inside with rigid foam board cut to fit, sealing the edges with foam or caulk. Pre-made vent covers cost $15 to $40 each and give a neater finish. If your area requires flood vents, check local code before closing any opening.
Then hunt for the gaps people miss. The rim joist at the top of the foundation wall is often the leakiest area in the house. Seal it with spray foam or rigid foam bedded in caulk. Seal plumbing, wiring, and duct penetrations with copper mesh and foam, fit an insulated, weatherstripped access door, and confirm dryers and combustion appliances vent outdoors, never into the sealed space.
Drainage and Sump Options
Encapsulation controls vapour, not floods. If water enters after rain, solve that first or the liner will simply float on a hidden pond. Start outside, because exterior fixes are cheapest: extend downspouts at least 6 feet from the foundation, regrade soil so it slopes away from the house, and clear blocked gutters.
For persistent entry, an interior perimeter drain is the standard solution. A perforated pipe set in gravel along the inside footing collects water and carries it to a sump basin. Expect $1,500 to $3,500 for an interior drain, plus $400 to $900 for a sump pump installation, or roughly $300 for a DIY pump, basin, and check valve.
Choosing a Sump Setup
- Use a sealed sump lid. An open basin lets moisture and soil gases back into your newly sealed space.
- Fit a check valve so discharged water cannot flow back, and run the discharge line well away from the foundation.
- Add a battery backup if your area has heavy storms or power cuts. A pump that stops during the worst storm is worth little.
- Test the pump twice a year by pouring in a bucket of water and watching it cycle and drain.
Dehumidification and Monitoring
Even a well-sealed crawl space needs active humidity control, especially in humid climates. Aim to keep relative humidity between 45 and 55 percent. Above 60 percent, mould risk returns even without liquid water. A crawl-space-rated dehumidifier, sized at roughly 70 to 90 pints per day for 1,000 to 1,500 sq ft, costs $900 to $1,400, plus $150 to $300 for a condensate pump or drain line if gravity drainage is impossible.
Standard room dehumidifiers are cheaper but usually fail within a season or two in crawl space conditions. A dedicated unit with a built-in humidistat and auto-restart after power loss is worth the difference. Some builders instead use a small HVAC supply duct, where code allows, but a dehumidifier gives direct, measurable control.
Monitoring protects the whole investment cheaply. Place two wireless hygrometers at opposite ends for $25 to $50 total, and check them monthly. A sudden rise warns of a plumbing leak, pump failure, or torn liner months before damage returns.
Insulation Choices for Encapsulated Spaces
In a vented crawl space, insulation belongs between the floor joists. In an encapsulated one, the logic flips: you insulate the foundation walls and bring the space inside the home’s thermal boundary. That keeps joists, ducts, and plumbing warmer, protects pipes from freezing, and removes sagging floor batts that trapped moisture. Remove old floor insulation if it is damp or falling down.
Comparing Wall Insulation Options
- Rigid foam board (XPS or polyisocyanurate): Typically R-10 to R-13 at 2 inches, costs about $1.50 to $3 per sq ft installed, resists moisture well, and can be glued and sealed by a competent DIYer. Joints must be taped and edges foamed.
- Closed-cell spray foam: About R-6.5 per inch, so 2 inches seals and insulates in one step, including the rim joist. Professional installation runs $3 to $5 per sq ft. It adheres permanently, so confirm all repairs are done first.
- Avoid open-cell foam and fiberglass against foundation walls. Both absorb or trap moisture in ways that undo the point of encapsulating.
Many codes require foam to be covered with a thermal barrier. Check local requirements before choosing.
Final Thoughts
Crawl space encapsulation works because it follows a sequence: fix bulk water, assess and repair damaged wood, lay a thick sealed liner, close vents and gaps, then control humidity and insulate the walls. Skipping the drainage step or using a thin liner are the two shortcuts that most often waste money. A full professional job for an average home typically costs $5,000 to $15,000, while a careful DIY project can land between $1,500 and $4,000. Either way, dry joists last decades longer, and that is the real return on the work.
Frequently Asked Questions
How much does crawl space encapsulation cost in total?
Most homeowners pay $5,000 to $15,000 professionally, or about $3 to $7 per sq ft, depending on liner thickness, drainage, and dehumidifier size. DIY materials for a 1,200 sq ft space usually run $1,500 to $4,000. Get itemised quotes so you can compare fairly.
Can I encapsulate my crawl space myself?
Yes, if the space has at least 2 to 3 feet of working height, no standing water, and no major rot. The work is slow and physical rather than highly technical. Leave interior drainage, sump wiring, and extensive joist repairs to professionals, and always fix water entry before laying the liner.
What thickness of vapor barrier should I use?
Choose a reinforced 12-mil liner as a minimum, and 20-mil if you store items in the space, have sharp gravel, or expect regular service visits. Avoid basic 6-mil sheeting. It punctures and tears easily, and replacing it means paying for the most labour-intensive part of the job twice.
Should crawl space vents be sealed permanently?
In an encapsulated system, yes. Open vents admit humid summer air that condenses on joists and ducts, which is a main cause of the moisture problem. Seal them as part of the system, but check local code first, especially in flood zones where approved flood vents may still be required.
Why does my encapsulated crawl space still smell musty?
A lingering smell usually means humidity is still above 60 percent, an old mould source was sealed in without cleaning, or a seam or sump lid is unsealed. Check hygrometer readings, inspect for plumbing leaks, and clean affected wood with a suitable mould treatment. The odour should fade within a few weeks once humidity stays controlled.